Task 1: Authentication API
In this task, you will add authentication to the Posts app. You will implement user sign-up, sign-in, and sign-out functionality using the Lucia Auth library. You will also secure the API routes to require authentication for creating, updating, and deleting posts.
Step 1: Understanding Authentication
Authentication is the process of verifying the identity of a user. It involves validating the user’s credentials, such as a username and password, to grant access to a system or application. Authentication is essential for securing user data and ensuring that only authorized users can access protected resources.
Authentication involves the following steps:
- User Registration: Users create an account by providing their details, such as name, email address, and password. The password is typically hashed before storing it in the database to enhance security.
- User Sign-In: Users provide their credentials (e.g., username and password) to authenticate themselves and gain access to the application.
- User Sign-Out: Users log out of the application to end their session and invalidate their authentication token or session.
Authentication vs. Authorization
Authentication is often confused with authorization, but they are distinct concepts:
- Authentication: Verifies the identity of a user by validating their credentials.
- Authorization: Determines what actions a user is allowed to perform after they have been authenticated.
In this task, you will focus on implementing authentication for the Posts app.
Step 2: Understanding Sessions and Cookies
In the context of web applications, authentication is typically implemented using sessions, tokens, or cookies.
- Sessions are server-side storage mechanisms that store user data and maintain the user’s state across multiple requests. A session ID is generated for each user, and the session data is stored on the server. The session ID is sent to the client as a cookie, and the client includes the session ID in subsequent requests to identify the user.
- Tokens are self-contained pieces of information that contain user data and are used to authenticate requests. Tokens are typically generated by the server and sent to the client, which includes the token in subsequent requests to authenticate the user. Tokens can be stored in cookies, local storage, or the browser’s memory.
Cookies are small pieces of data stored in the user’s browser that are sent with each request to identify the user. Cookies are commonly used to store session IDs, authentication tokens, and other user-related information. Cookies can be set with an expiration time, domain, and path to control their behavior.
To send a cookie in an HTTP response, you set the Set-Cookie header with the cookie’s name and value. The browser automatically includes the cookie in subsequent requests to the same domain.
In this task, you will use sessions and cookies to manage user authentication in the Posts app.
Lucia Auth
Lucia Auth is a library that provides simple and secure user authentication and session management for web applications. It abstracts away the complexity of handling sessions and provides an API that’s easy to use, understand, and extend. Lucia Auth supports various adapters for different databases and session storage mechanisms.
We will use Lucia Auth with the Drizzle SQLite adapter to manage user sessions and authentication in the Posts app.
Step 3: Setting Up the Authentication Routes
In this step, you will create the authentication routes for sign-up, sign-in, and sign-out. Create a new file api/src/routes/auth.ts and add the following code:
import { Hono } from "hono";
const authRoutes = new Hono();
authRoutes.post("/sign-in", async (c) => {
const { username, password } = await c.req.json();
console.log({ username, password });
return c.json({ message: "You have been signed in!" });
});
authRoutes.post("/sign-up", async (c) => {
const { name, username, password } = await c.req.json();
console.log({ name, username, password });
return c.json({ message: "You have been signed up!" }, 201);
});
authRoutes.post("/sign-out", async (c) => {
return c.json({ message: "You have been signed out!" });
});
export default authRoutes;Typically, a successful POST request results in a 201 Created status code, indicating that a new resource has been created. However, in the case of authentication routes, it is common to return a 200 Ok status code for sign-in and sign-out routes, and a 201 Created status code for the sign-up route.
Moreover, while the general wisdom is to use plural nouns for routes (such as posts, comments, users, etc.), for authentication routes, it is common to use endpoints such as login, sign-in, register, sign-up, logout, sign-out, etc. If we wanted to align more closely with RESTful principles while still being clear, we could consider nesting these actions under a noun. For example:
- POST
/sessionsfor sign-in (creating a new session) - DELETE
/sessionsfor sign-out (ending a session) - POST
/usersfor sign-up (creating a new user resource)
Step 4: Adding Authentication Routes to the API Server
Update the api/src/app.ts file to include the authentication routes:
// Other imports
+ import authRoutes from "./routes/auth";
// Other routes
+ app.route("/", authRoutes);
app.route("/", postRoutes);
app.route("/", commentRoutes);
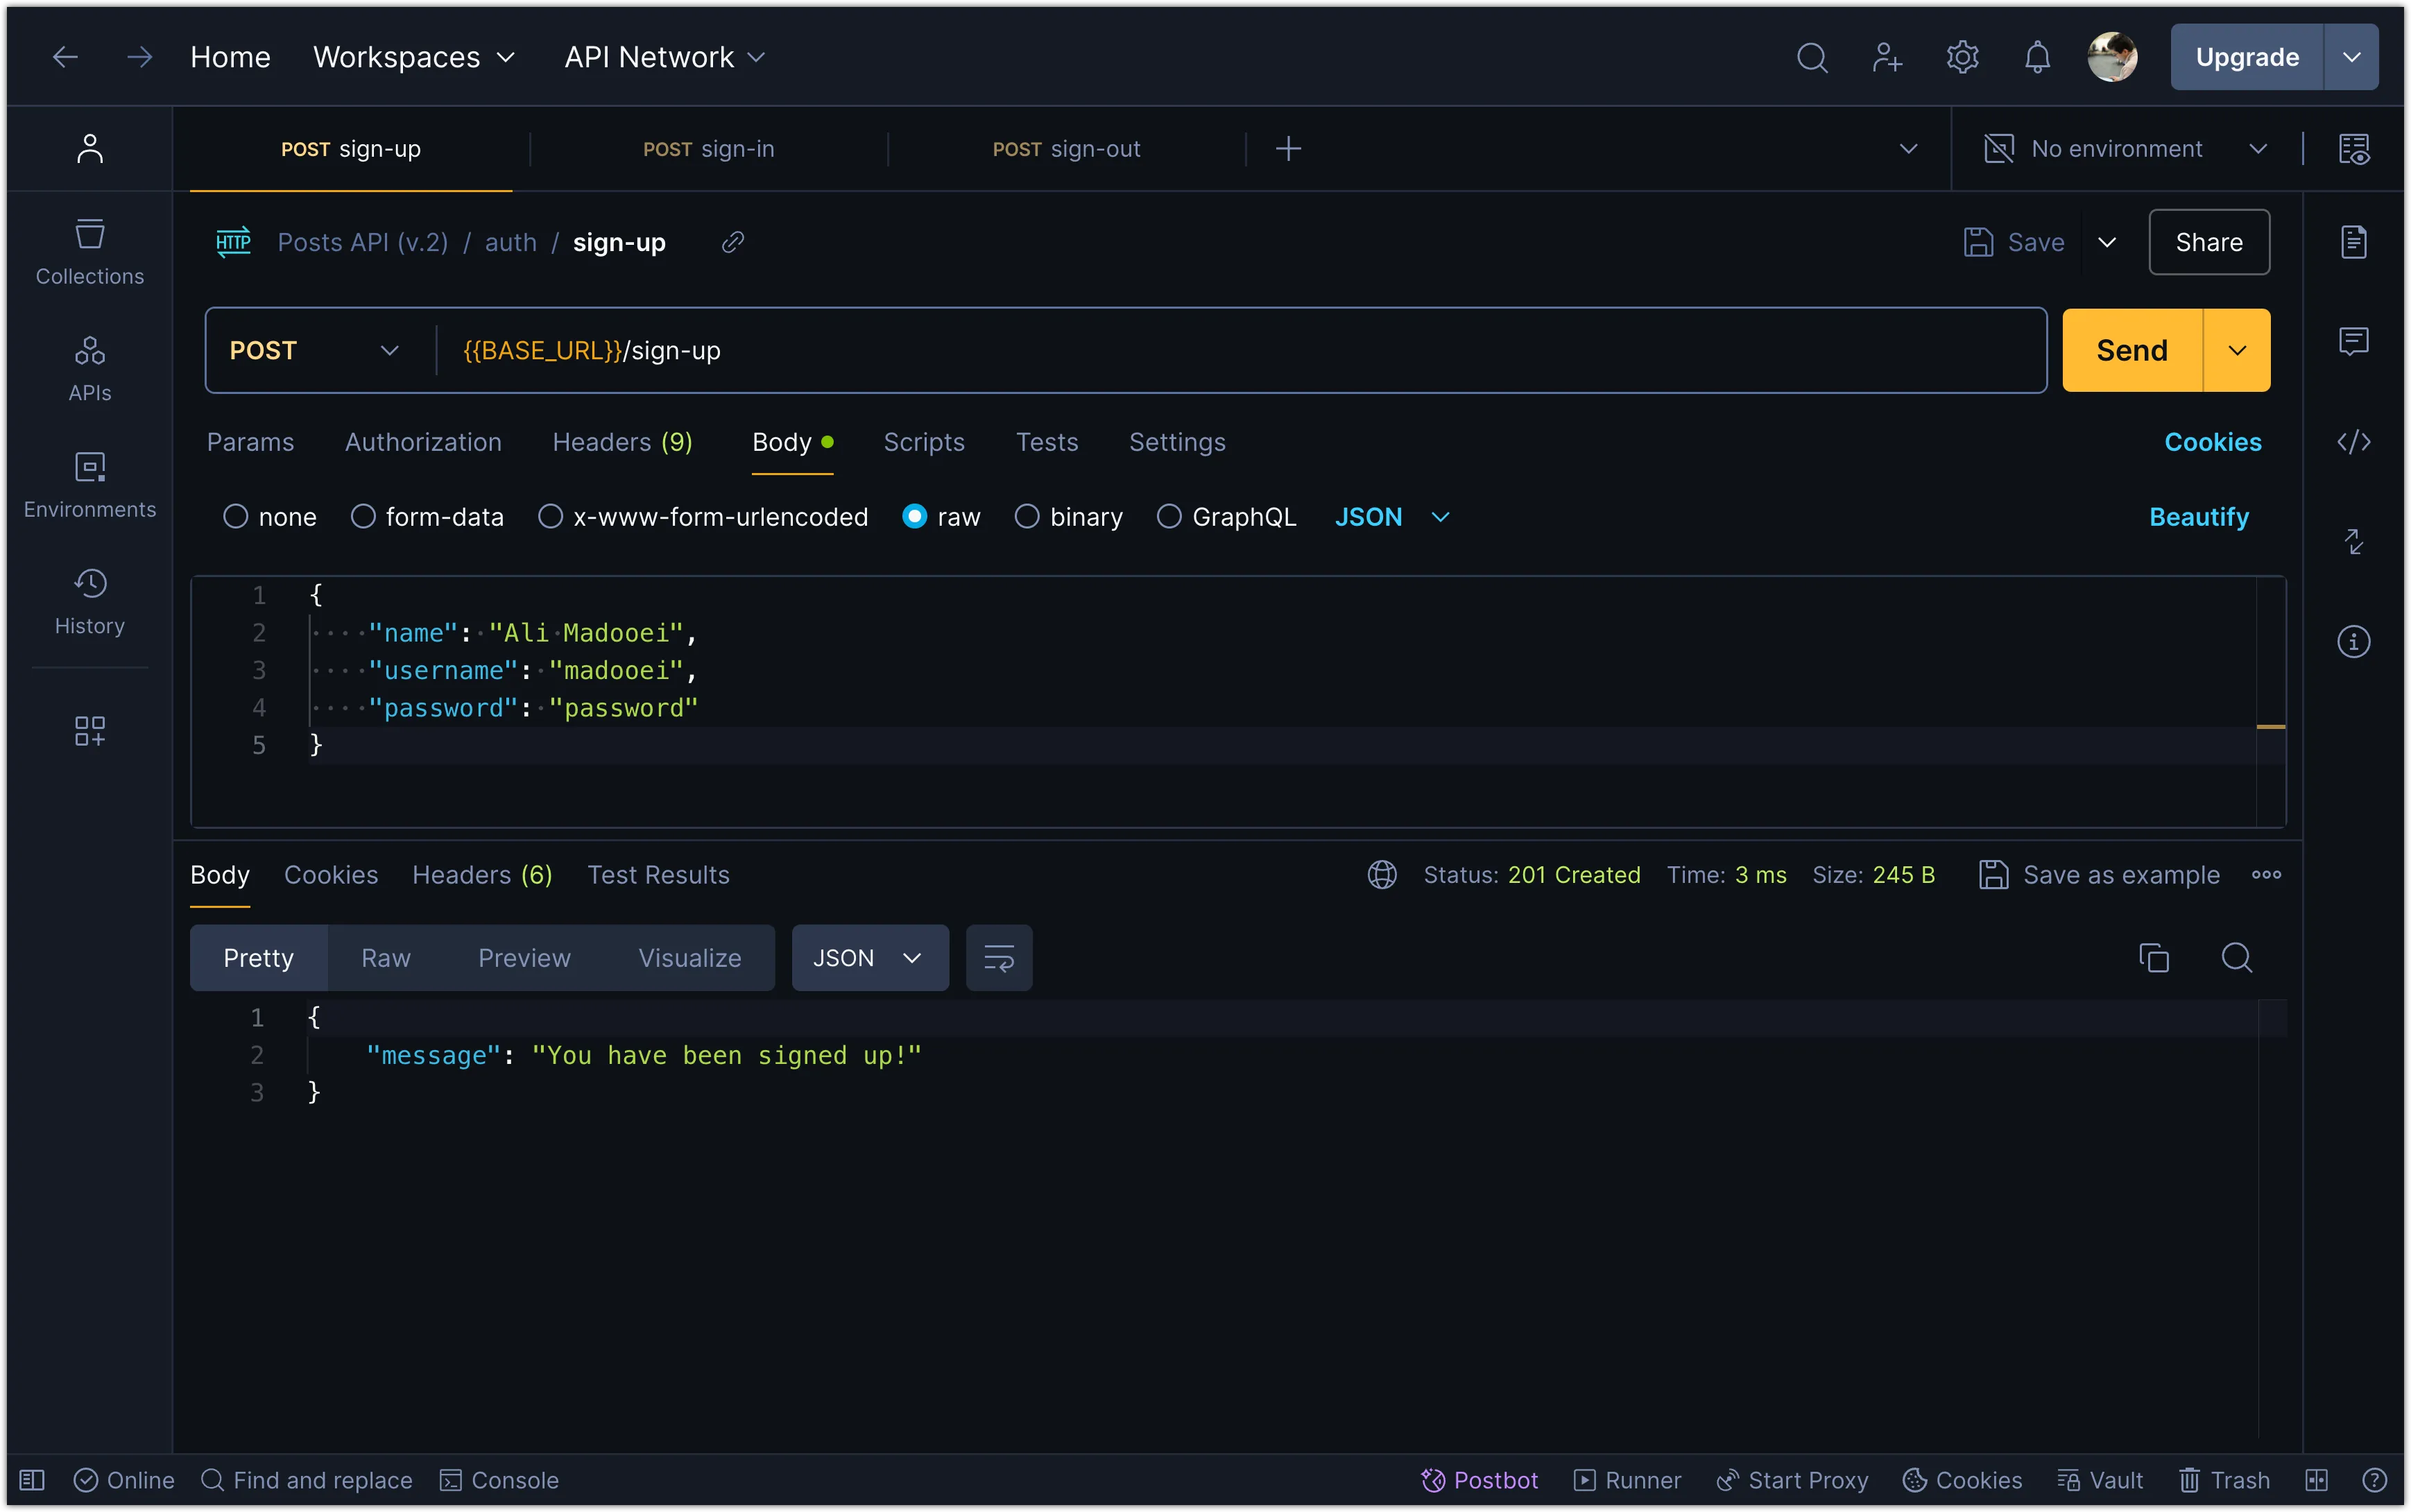
// The rest of the fileTry these endpoints in Postman to ensure they are working as expected.
Add Logging to Hono
It might be helpful to add logging to the Hono instance to see the incoming requests and outgoing responses. You can do this by adding the following code to the api/src/app.ts file:
// Other imports
+ import { logger } from "hono/logger";
+ app.use(logger());
app.use("/*", cors());
// Other routesIf you now restart the server and make a request to the authentication routes, you should see the incoming requests and outgoing responses in the console.
Server is running on port 3000
<-- POST /sign-up
{ name: 'Ali Madooei', username: 'madooei', password: 'passWord1' }
--> POST /sign-up 201 7ms
<-- POST /sign-in
{ username: 'madooei', password: 'passWord1' }
--> POST /sign-in 200 3ms
<-- POST /sign-out
--> POST /sign-out 200 5msStep 5: Adding Input Validation to the Authentication Routes
Let’s add some validation to the sign-up and sign-in routes. Add the following code to the api/src/validators/schemas.ts file:
// Other schemas
export const signUpSchema = z.object({
username: z
.string()
.min(3, "Username must be at least 3 characters")
.max(20, "Username must be 20 characters or less"),
name: z
.string()
.min(1, "Name is required")
.max(50, "Name must be 50 characters or less"),
password: z
.string()
.min(8, "Password must be at least 8 characters")
.refine(
(value) => {
return (
/[a-z]/.test(value) && /[A-Z]/.test(value) && /[0-9]/.test(value)
);
},
{
message:
"Password must contain at least one lowercase letter, one uppercase letter, and one number",
},
),
});
export const signInSchema = z.object({
username: z.string(),
password: z.string(),
});Notice the refine method in the password field of the signUpSchema. This method allows you to add custom validation logic to the schema. In this case, we are checking that the password contains at least one lowercase letter, one uppercase letter, and one number.
The /[a-z]/.test(value) is a regular expression that checks if the password contains at least one lowercase letter. Similarly, /[A-Z]/.test(value) checks for an uppercase letter, and /[0-9]/.test(value) checks for a number.
Update the Authentication Routes
Add validation to the sign-up and sign-in routes in the api/src/routes/auth.ts file:
import { Hono } from "hono";
+ import { signInSchema, signUpSchema } from "../validators/schemas";
+ import { zValidator } from "@hono/zod-validator";
const authRoutes = new Hono();
authRoutes.post("/sign-in",
+ zValidator("json", signInSchema),
async (c) => {
- const { username, password } = await c.req.json();
+ const { username, password } = c.req.valid("json");
console.log({ username, password });
return c.json({ message: "You have been signed in!" });
}
);
authRoutes.post("/sign-up",
+ zValidator("json", signUpSchema),
async (c) => {
- const { name, username, password } = await c.req.json();
+ const { name, username, password } = c.req.valid("json");
console.log({ name, username, password });
return c.json({ message: "You have been signed up!" }, 201);
}
);
authRoutes.post("/sign-out",
async (c) => {
return c.json({ message: "You have been signed out!" });
}
);
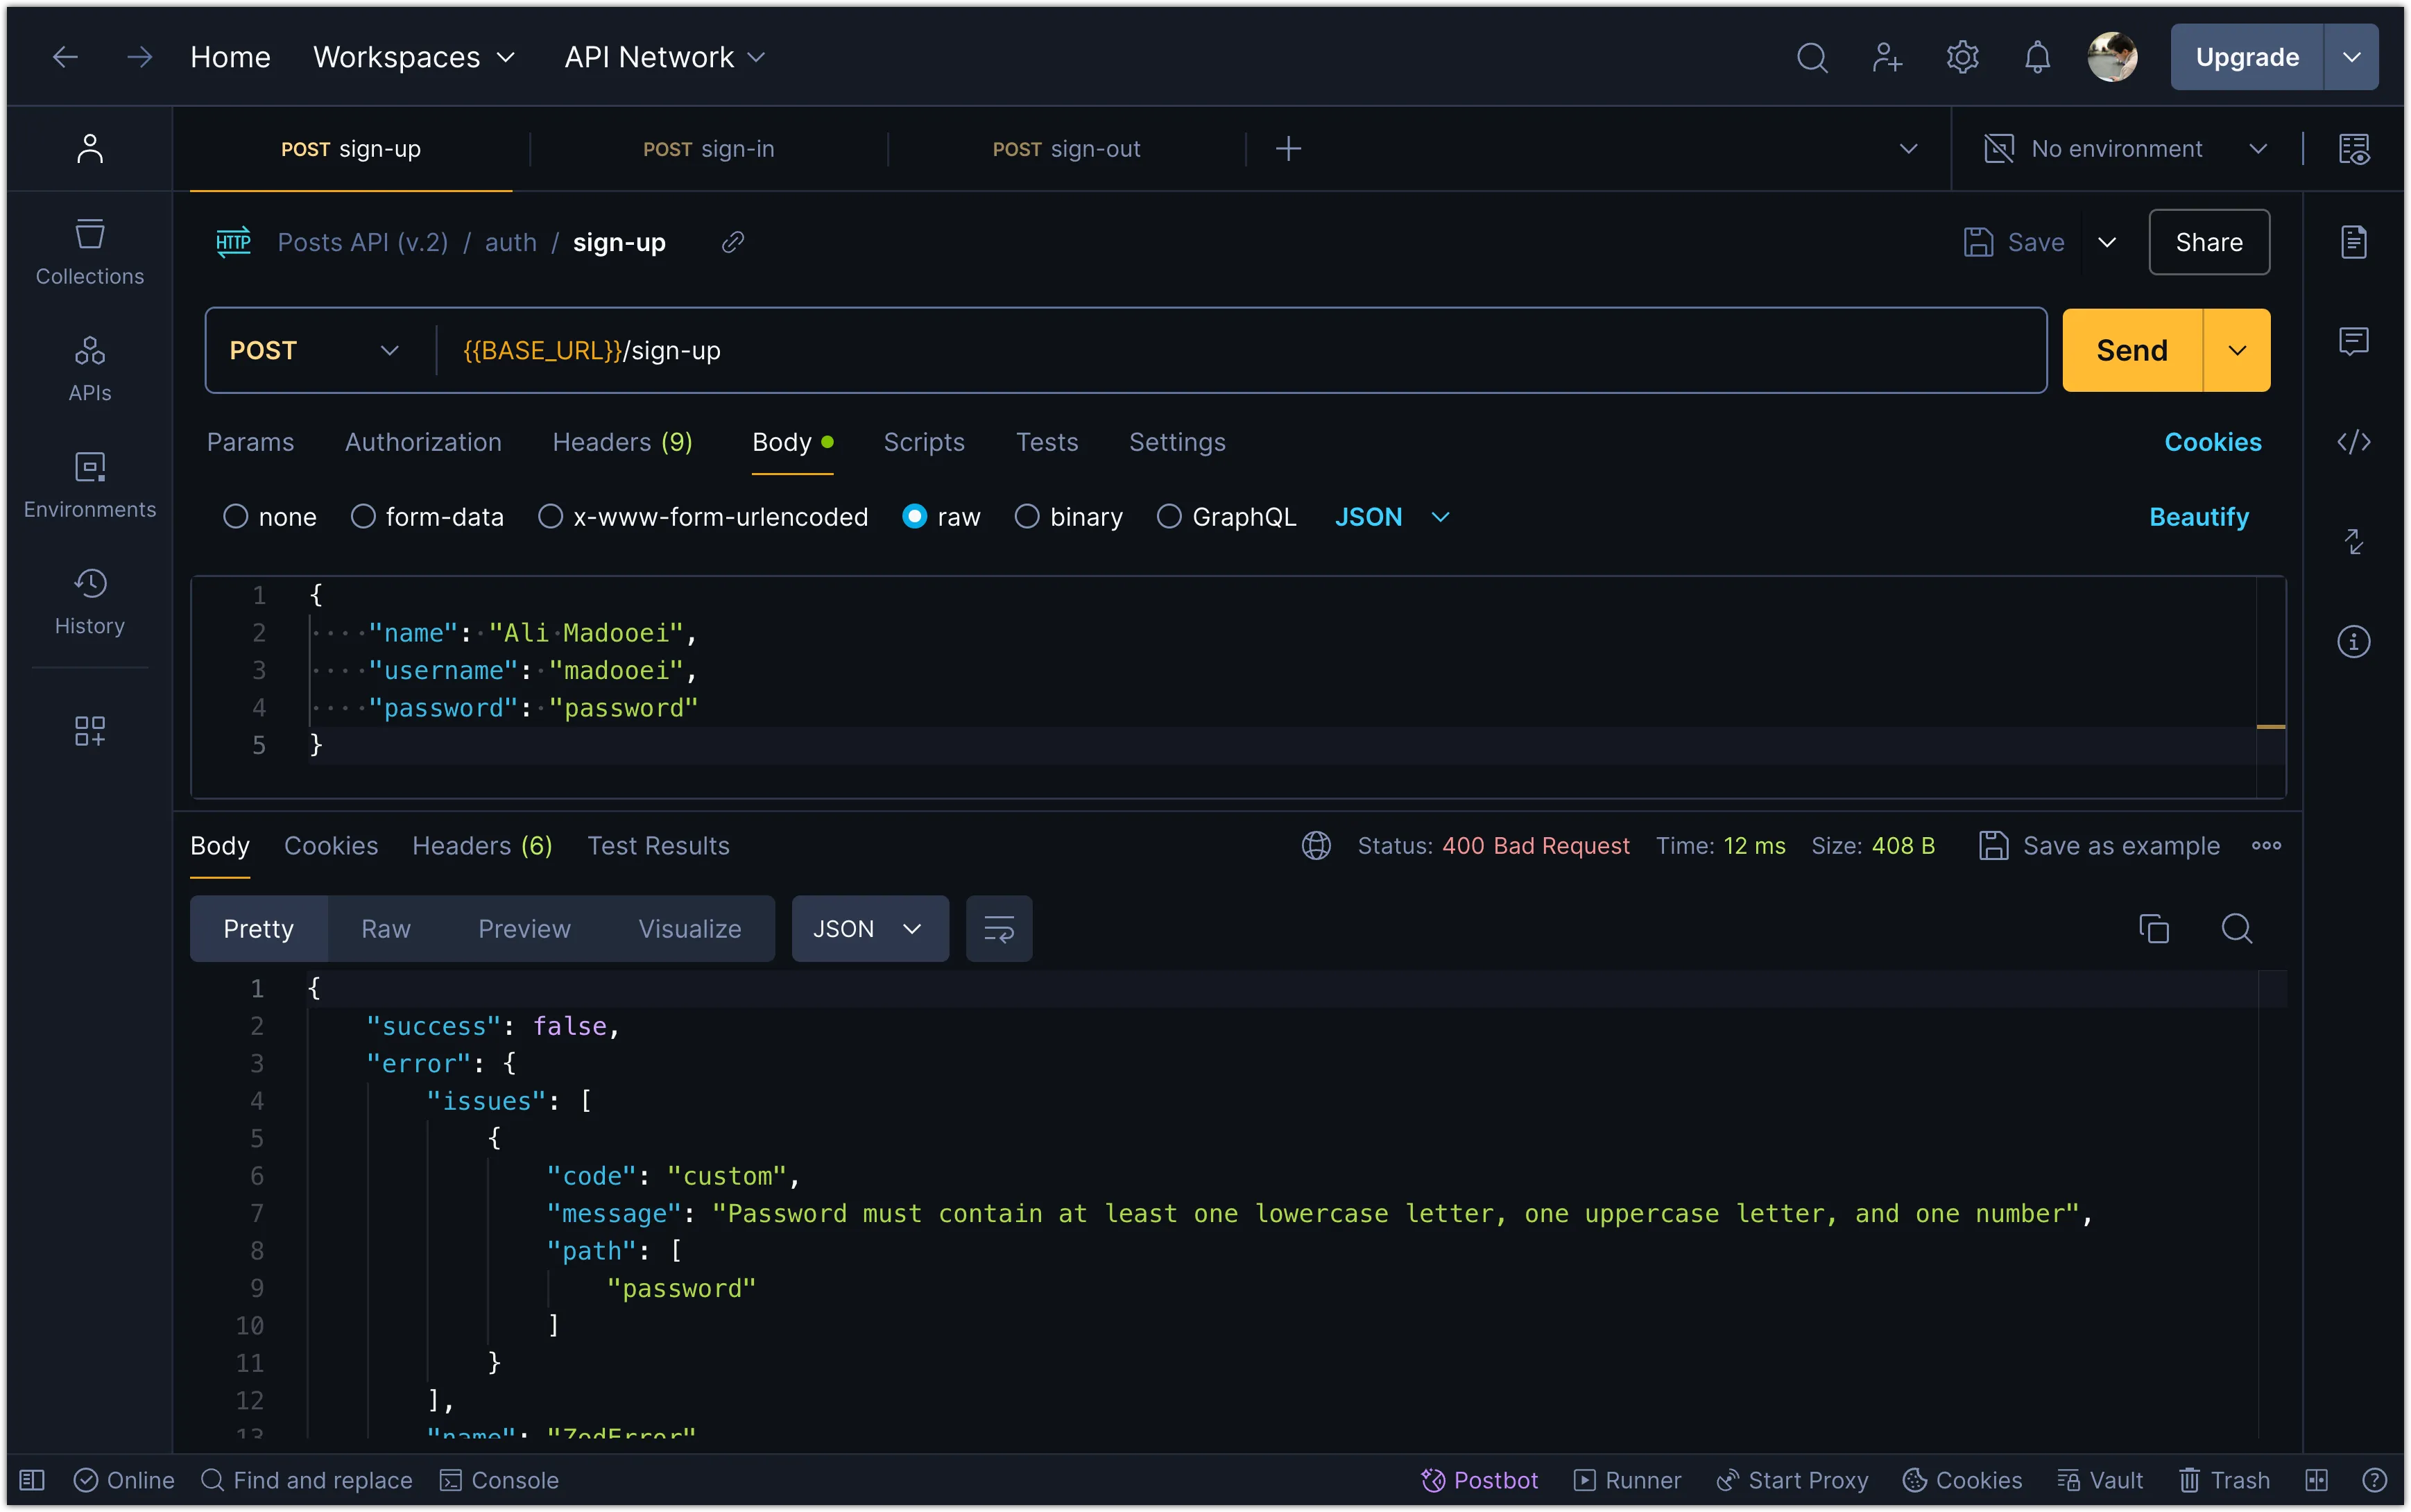
export default authRoutes;Now, if you try to sign up with invalid data, you should receive an error message indicating what went wrong.
Step 6: Adding a SQLite Table for User Data
In this step, you will add a SQLite table for storing user data. Create a new file api/src/db/schema.ts and add the following code:
export const users = sqliteTable("users", {
id: integer("id").primaryKey({ autoIncrement: true }),
name: text("name").notNull(),
username: text("username").notNull().unique(),
password_hash: text("password").notNull(),
});Notice that we are storing the password hash instead of the plain text password. This is a common practice to enhance security. Moreover, we are using the unique constraint on the username field to ensure that each username is unique.
Next, run the following command to update the SQLite table:
cd api
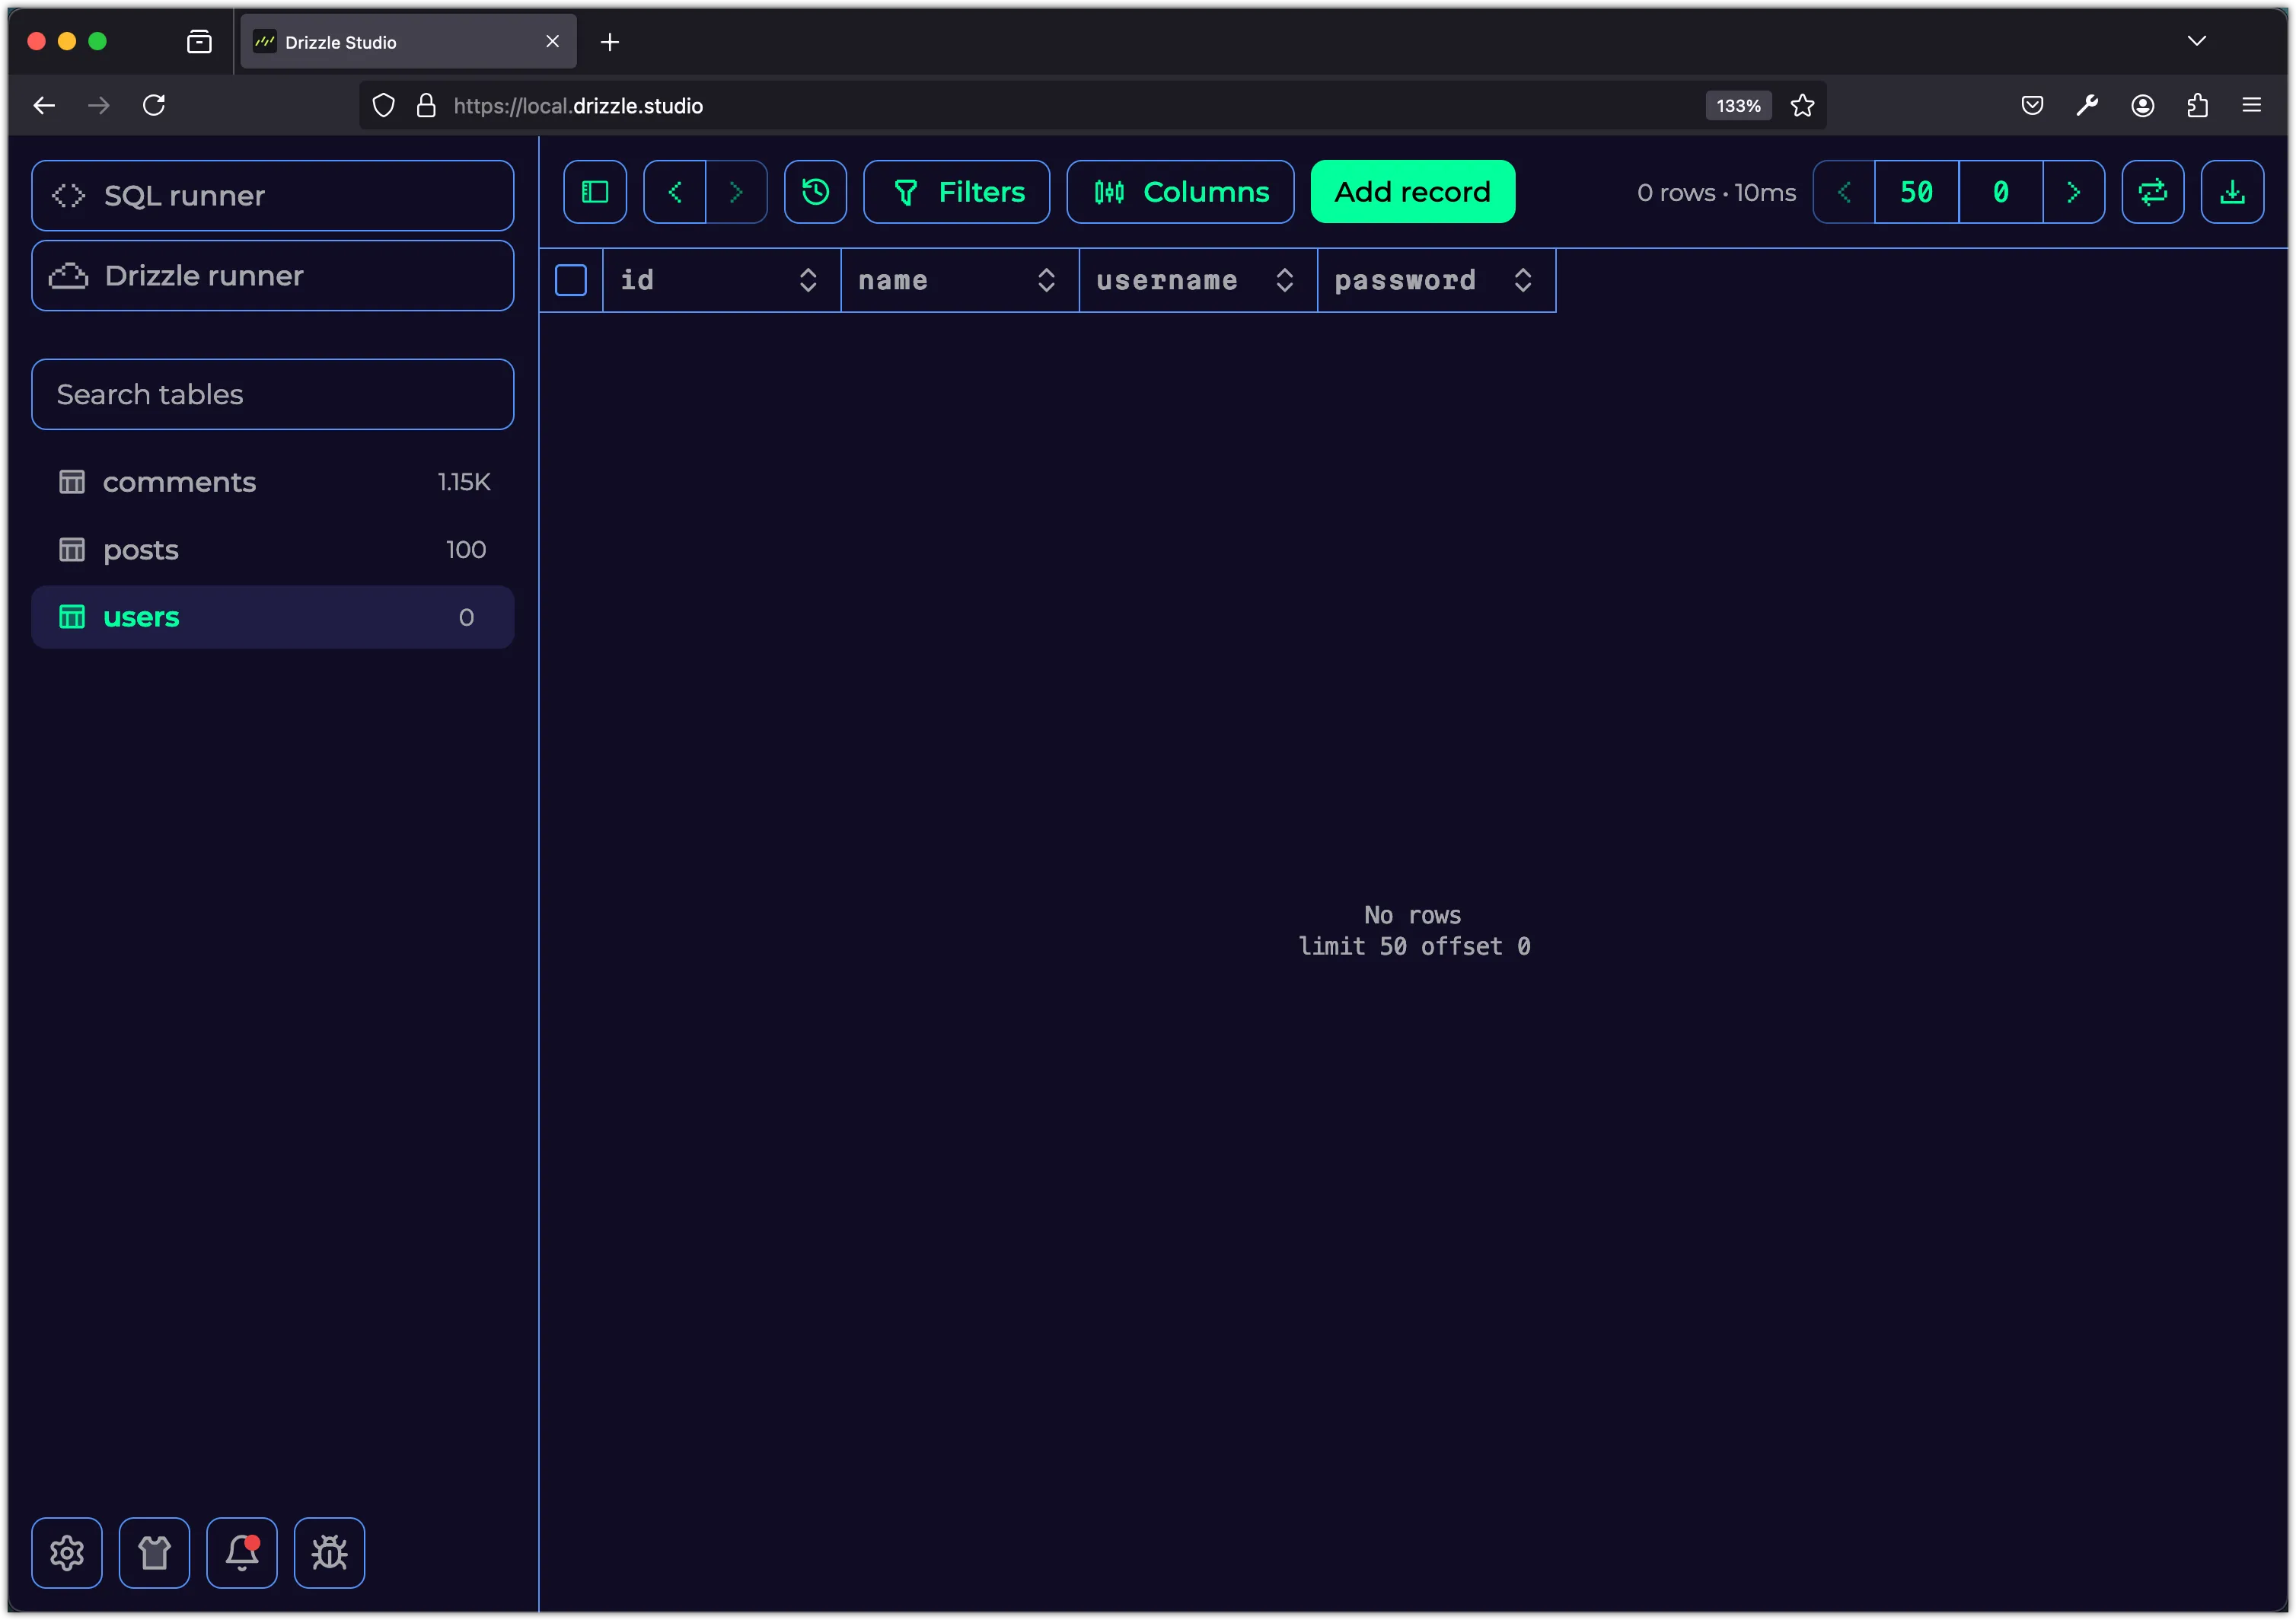
pnpm db:pushThis command will create the users table in the SQLite database.
Step 7: Hashing Passwords and Storing User Data
In this step, you will hash the password before storing it in the database. We will use the Argon2 password hashing algorithm, which is considered one of the best choices for password hashing due to its resistance to GPU attacks and side-channel attacks.
First, install the @node-rs/argon2 package:
pnpm add @node-rs/argon2Next, update the api/src/routes/auth.ts file to hash the password before storing it in the database:
// Other imports
import { hash } from "@node-rs/argon2";
import { db } from "../db";
import { users } from "../db/schema";
// Recommended minimum parameters for Argon2 hashing
const hashOptions = {
memoryCost: 19456,
timeCost: 2,
outputLen: 32,
parallelism: 1,
};
authRoutes.post("/sign-up",
zValidator("json", signUpSchema),
async (c) => {
const { name, username, password } = c.req.valid("json");
const passwordHash = await hash(password, hashOptions);
const newUser = await db
.insert(users)
.values({
username,
name,
password_hash: passwordHash,
})
.returning()
.get();
return c.json(
{
message: "You have been signed up!",
user: {
id: newUser.id,
name: newUser.name,
username: newUser.username,
},
},
201,
);
}
);The hash function takes the password and a configuration object as arguments. The configuration object specifies the memory cost, time cost, output length, and parallelism. These parameters determine the security and performance of the hashing algorithm.
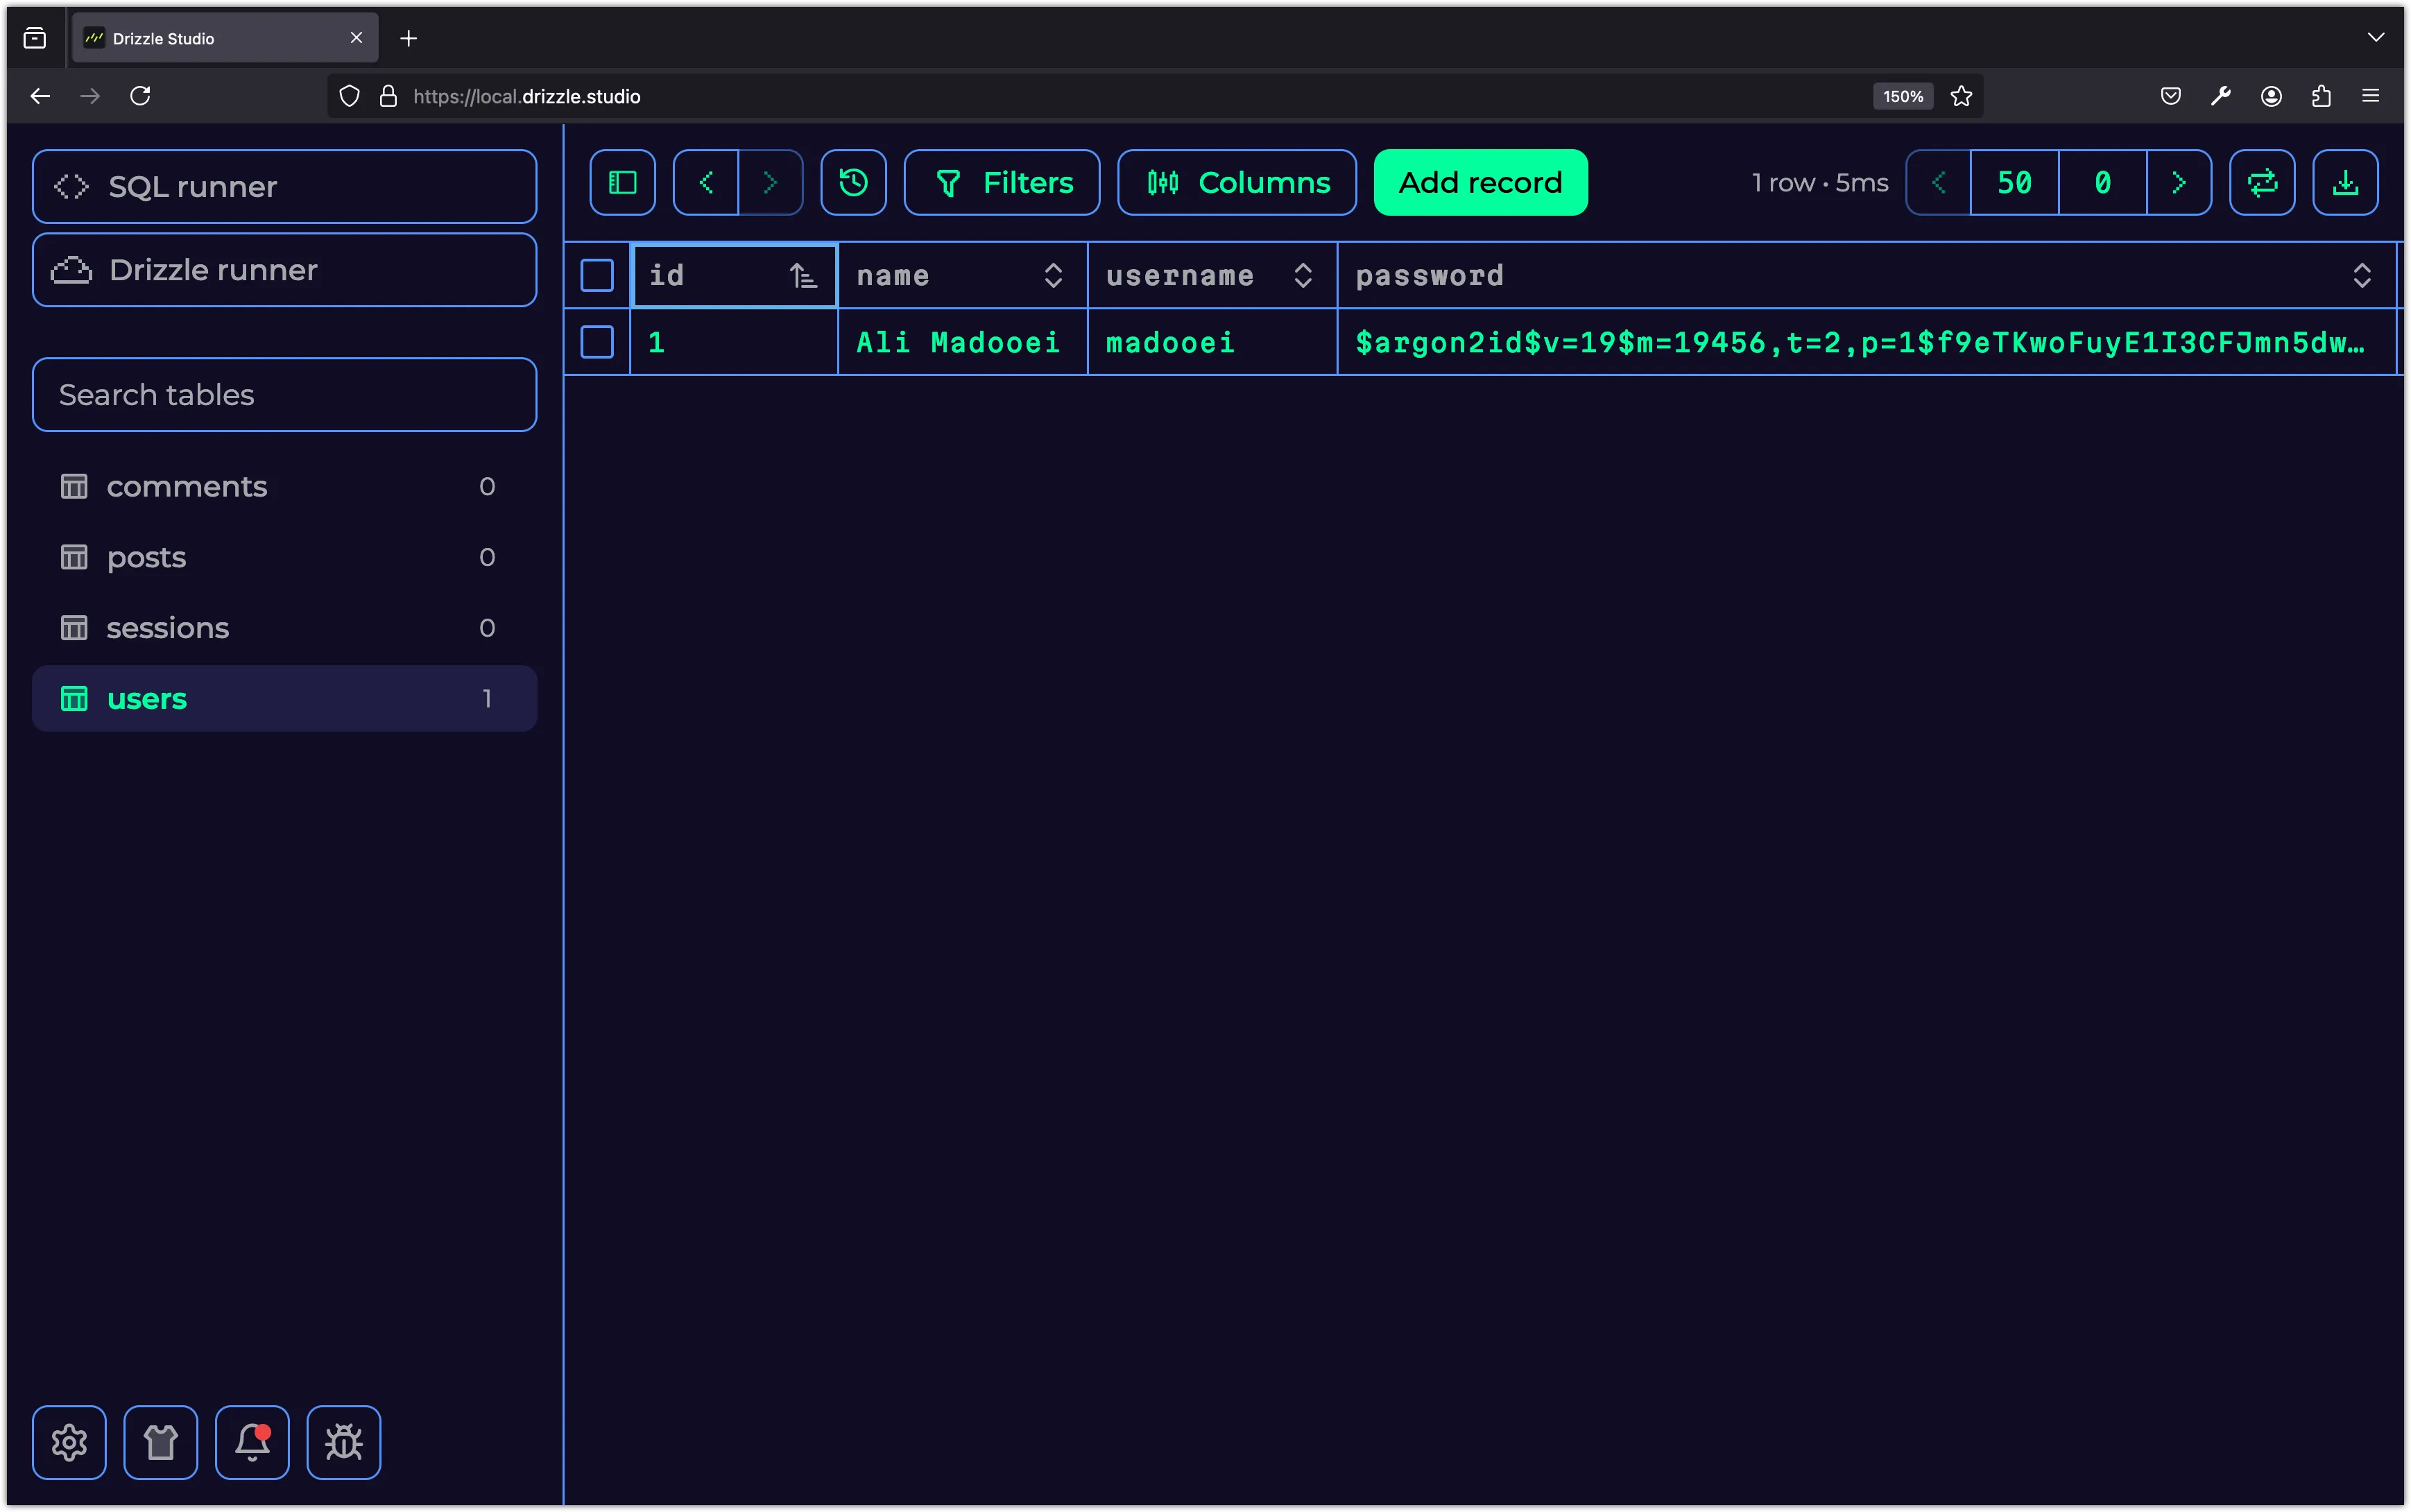
Now, try signing up with a new user in Postman.
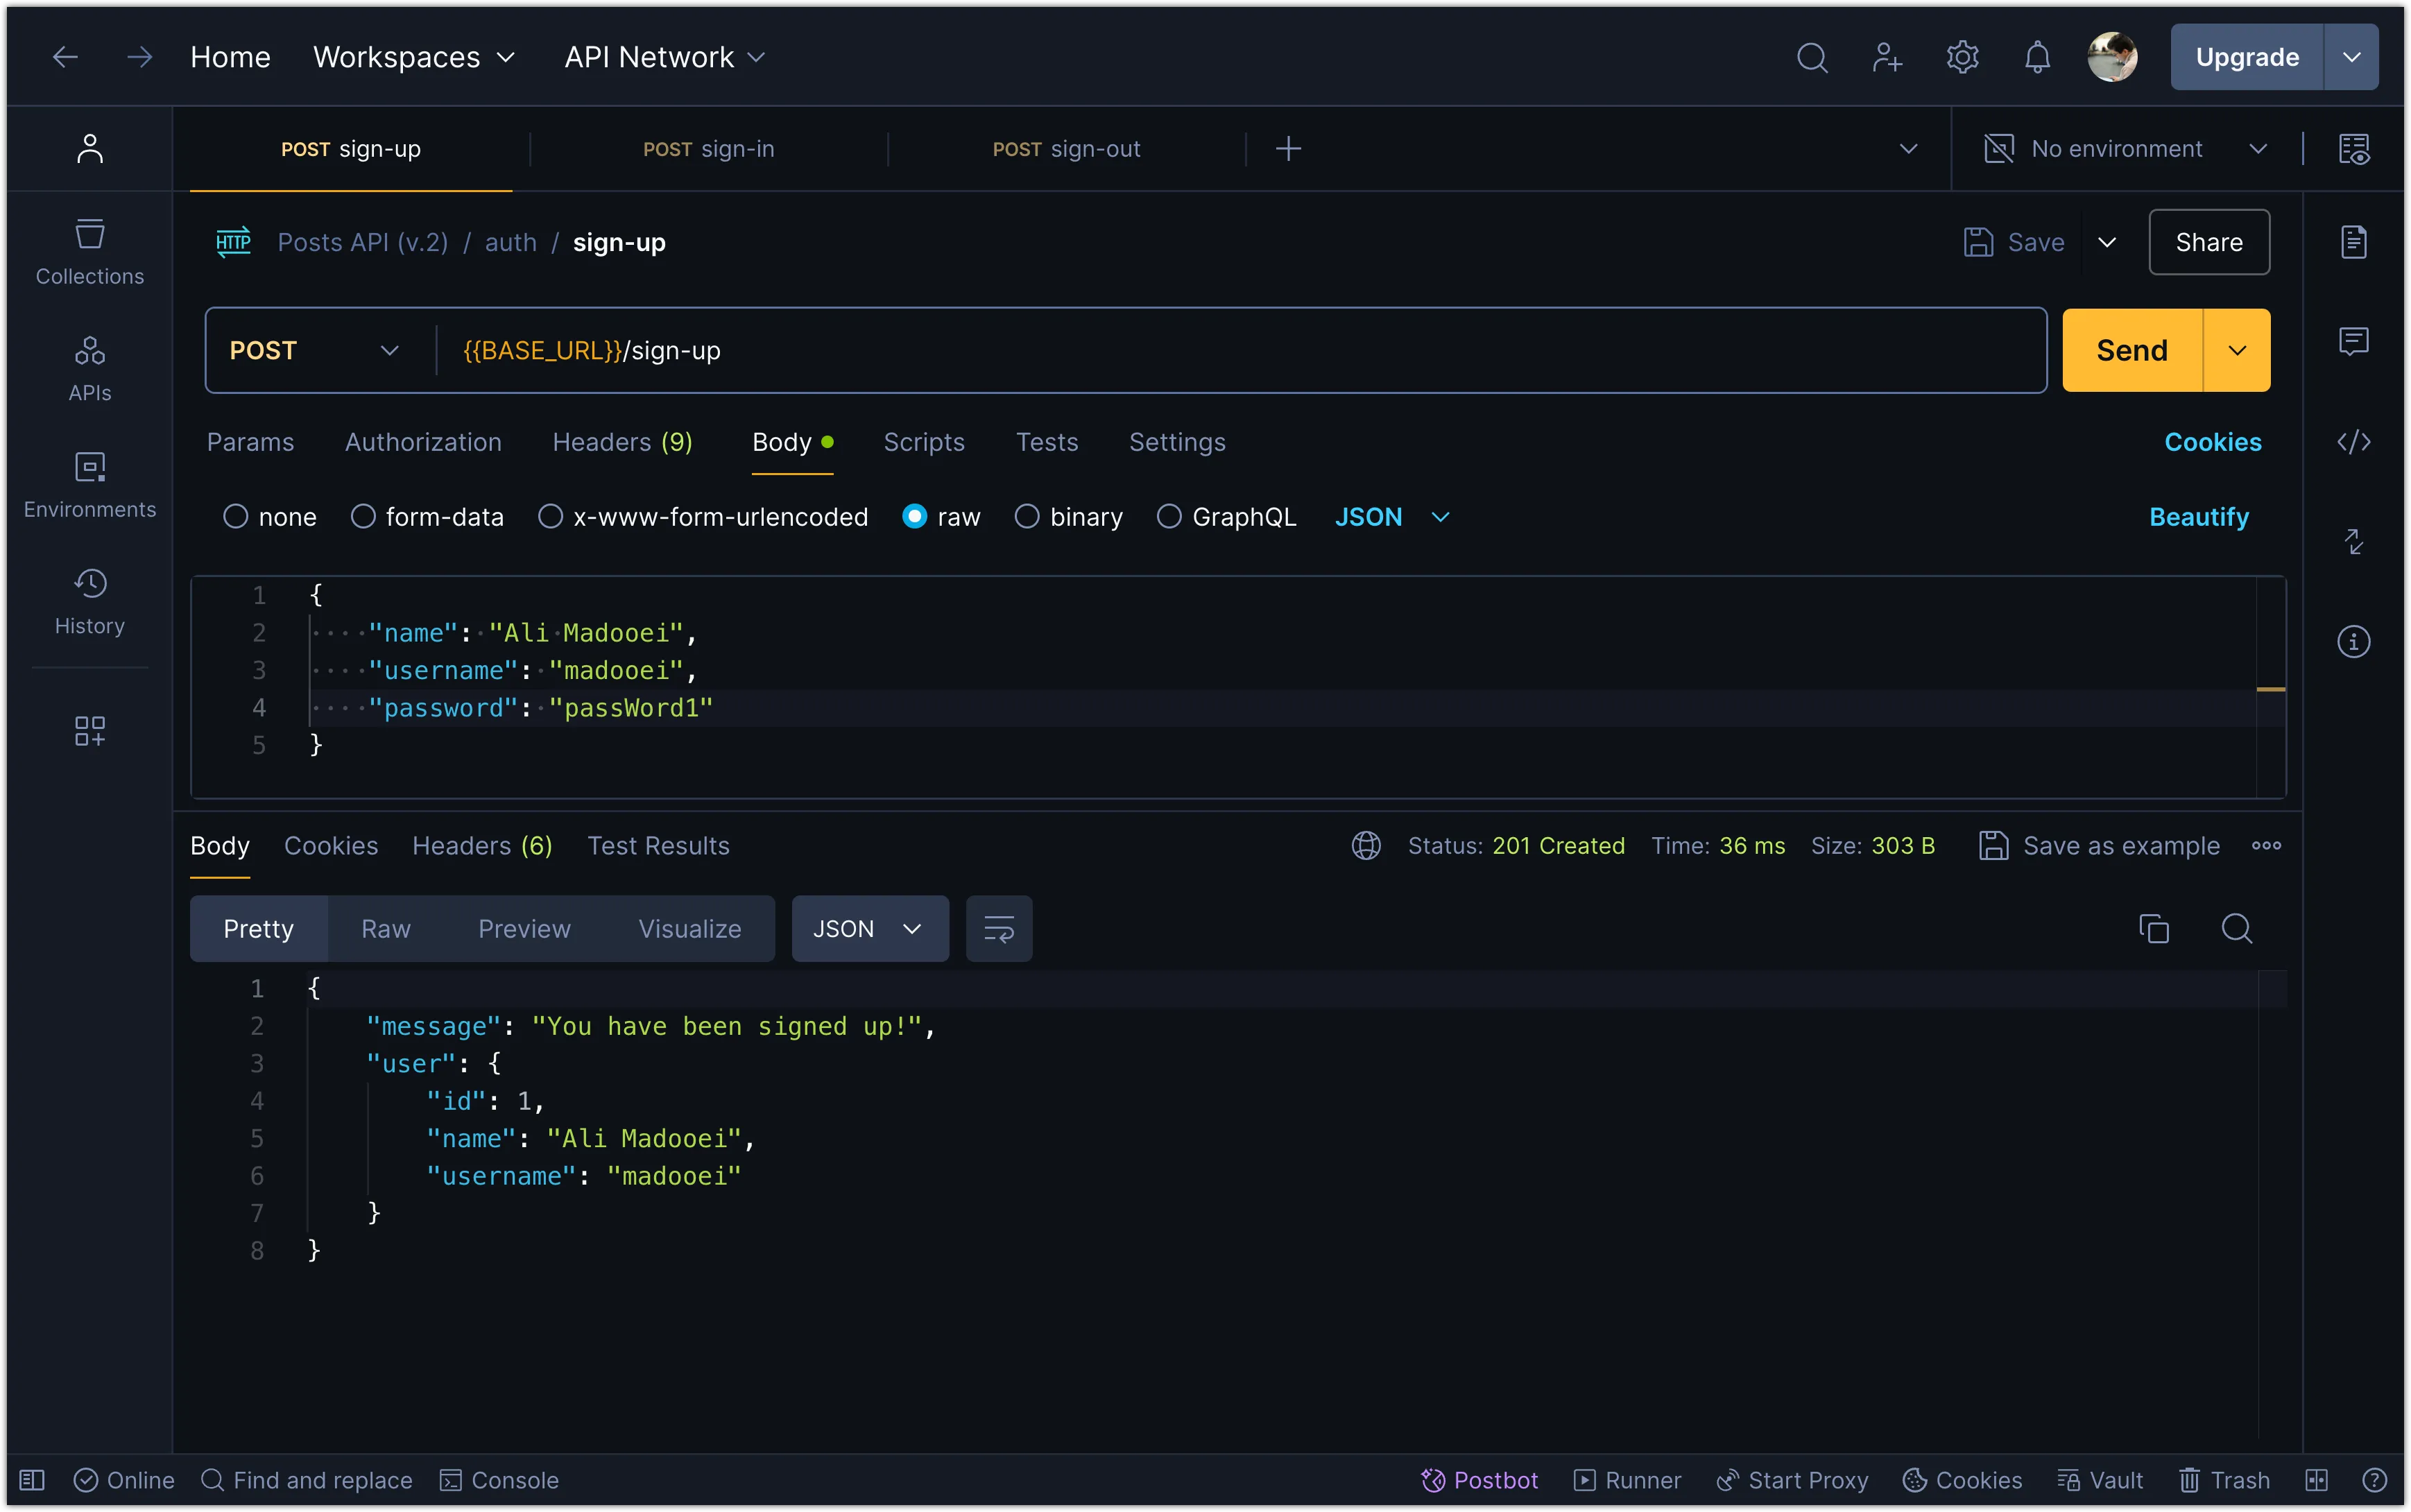
You should see the user data stored in the database with the password hashed.
Step 8: Verifying Passwords During Sign-In
In this step, you will update the sign-in route to verify the password hash during authentication. We will use the verify function from the @node-rs/argon2 package to compare the password hash stored in the database with the password provided during sign-in. Update the api/src/routes/auth.ts file to verify the password during sign-in:
// Other imports
import { hash, verify } from "@node-rs/argon2";
import { HTTPException } from "hono/http-exception";
import { eq } from "drizzle-orm";
authRoutes.post("/sign-in",
zValidator("json", signInSchema),
async (c) => {
const { username, password } = c.req.valid("json");
const user = await db
.select()
.from(users)
.where(eq(users.username, username))
.get();
if (!user) {
throw new HTTPException(401, {
message: "Incorrect username or password"
});
}
const validPassword = await verify(user.password_hash, password, hashOptions);
if (!validPassword) {
throw new HTTPException(401, {
message: "Incorrect username or password",
});
}
return c.json({
message: "You have been signed in!",
user: {
id: user.id,
name: user.name,
username: user.username,
},
});
}
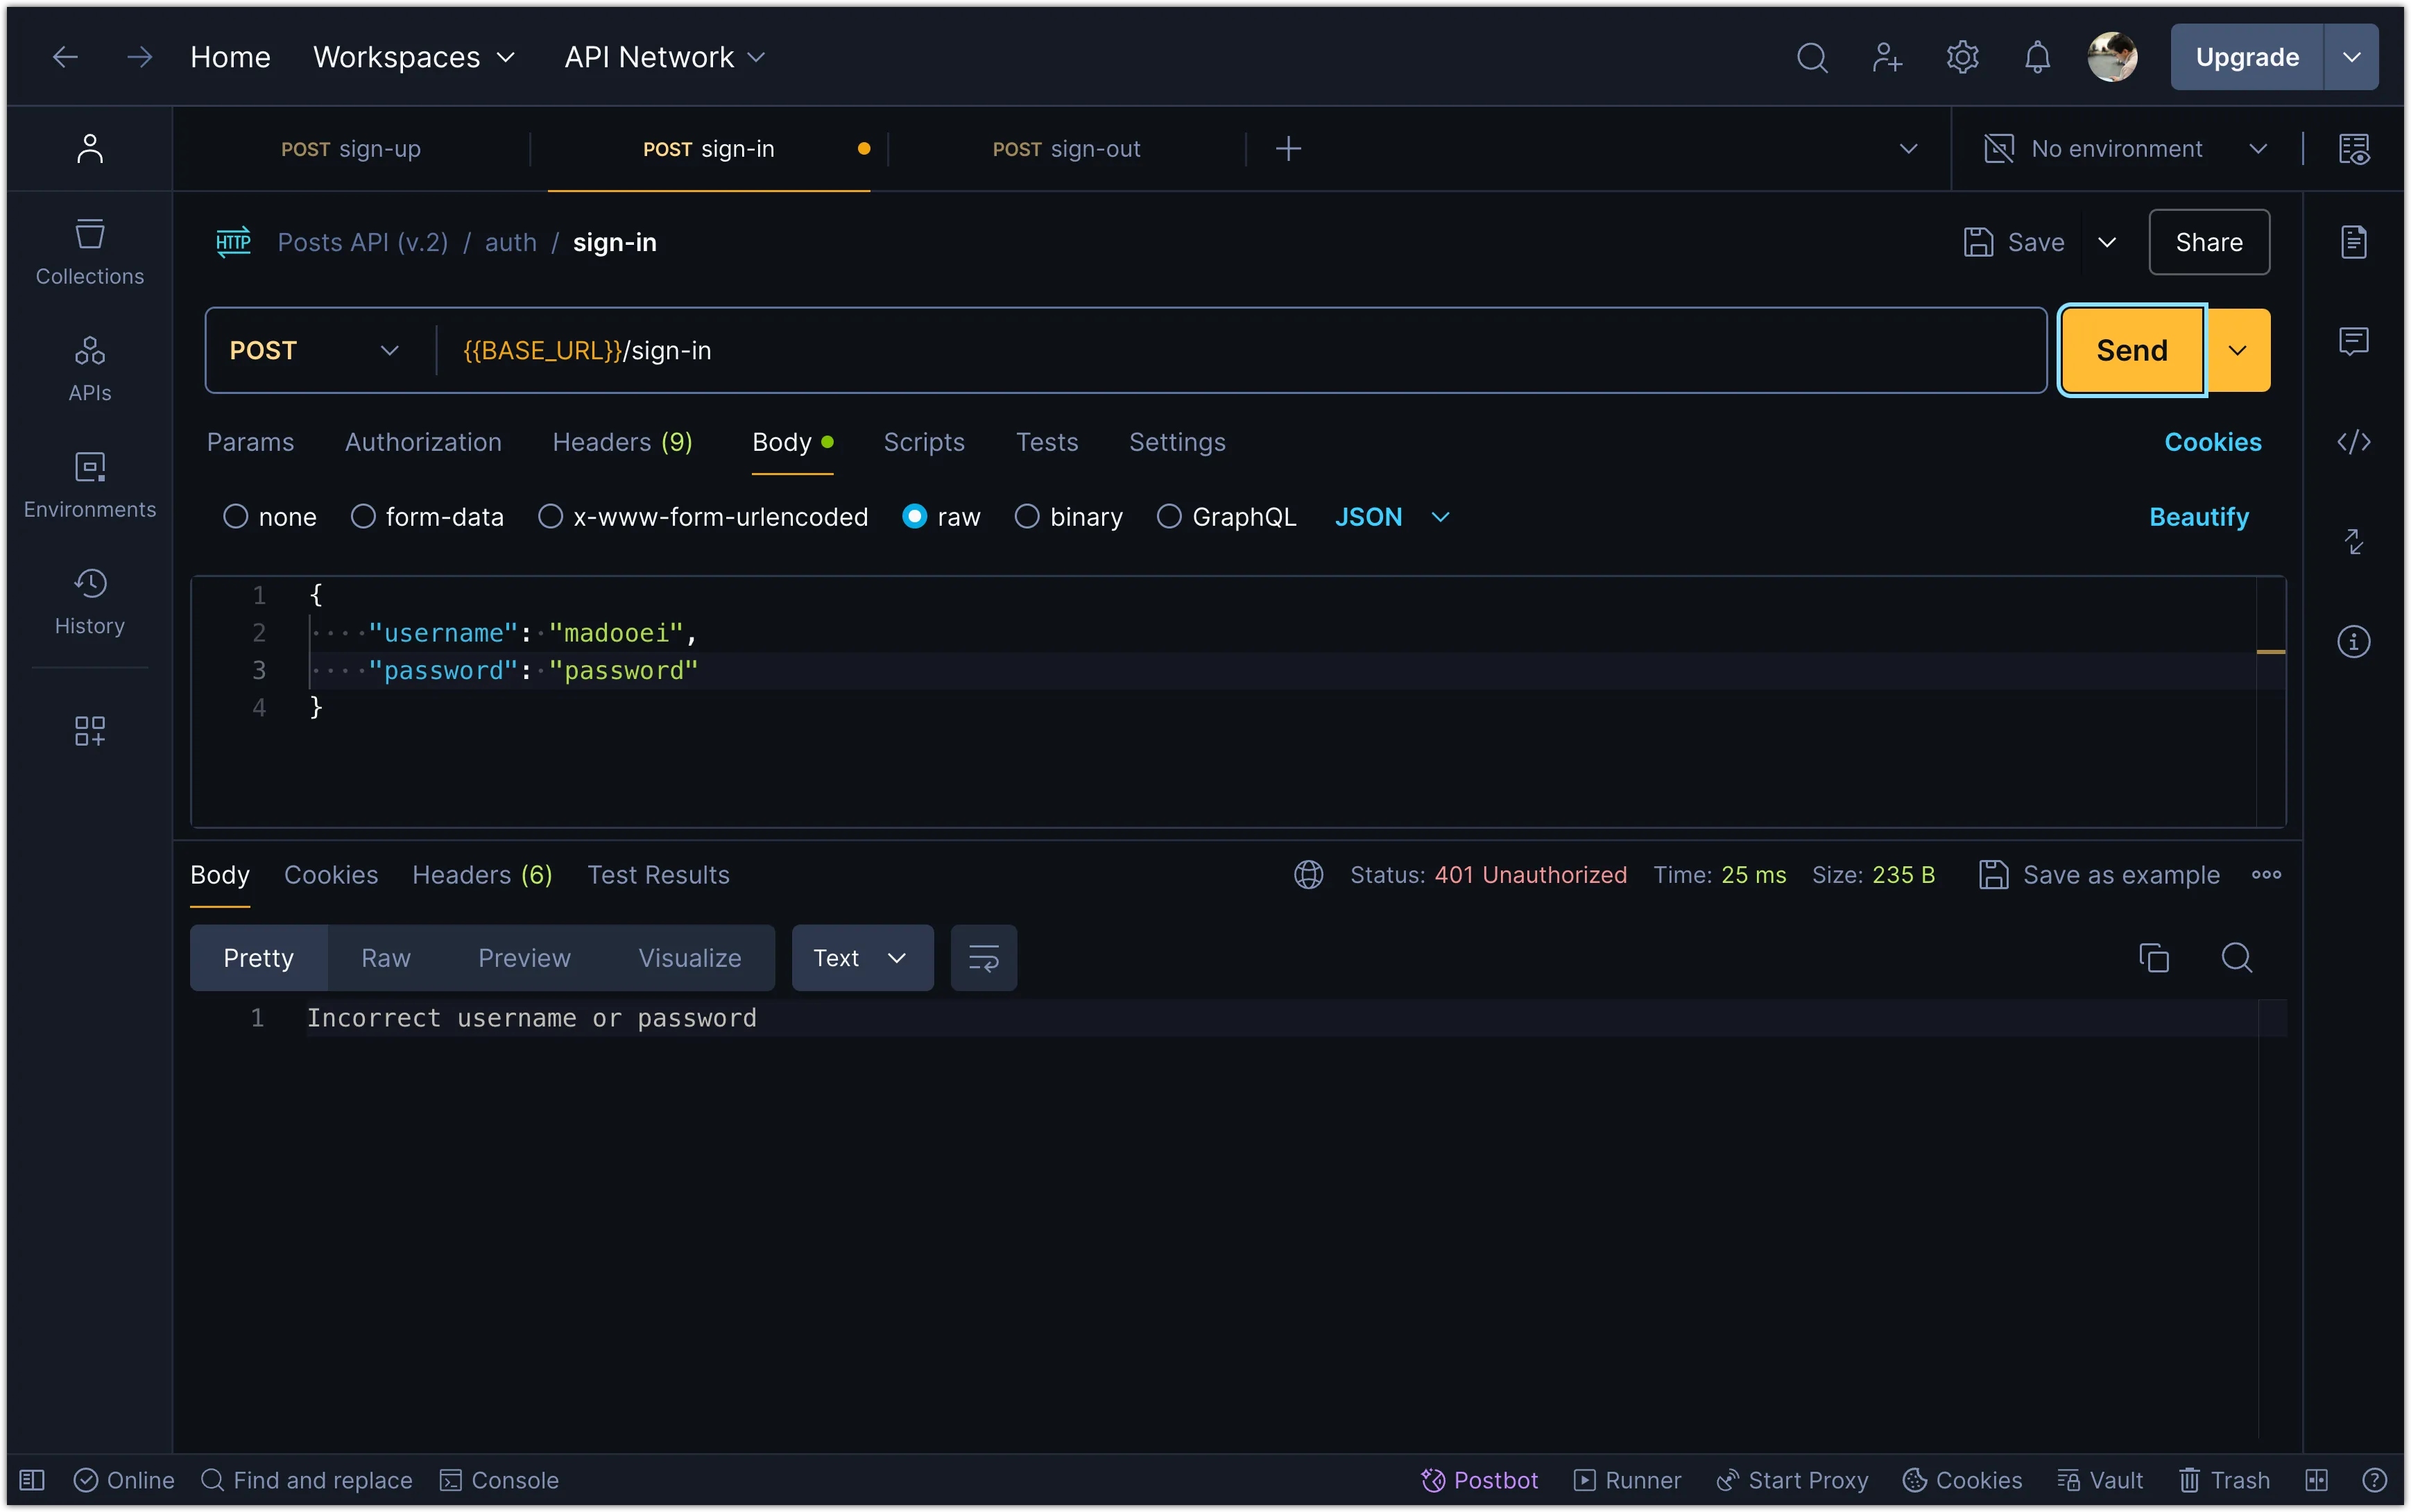
);Notice that we are using the verify function to compare the password hash stored in the database with the password provided during sign-in. If the passwords match, the user is successfully signed in; otherwise, an error message is returned.
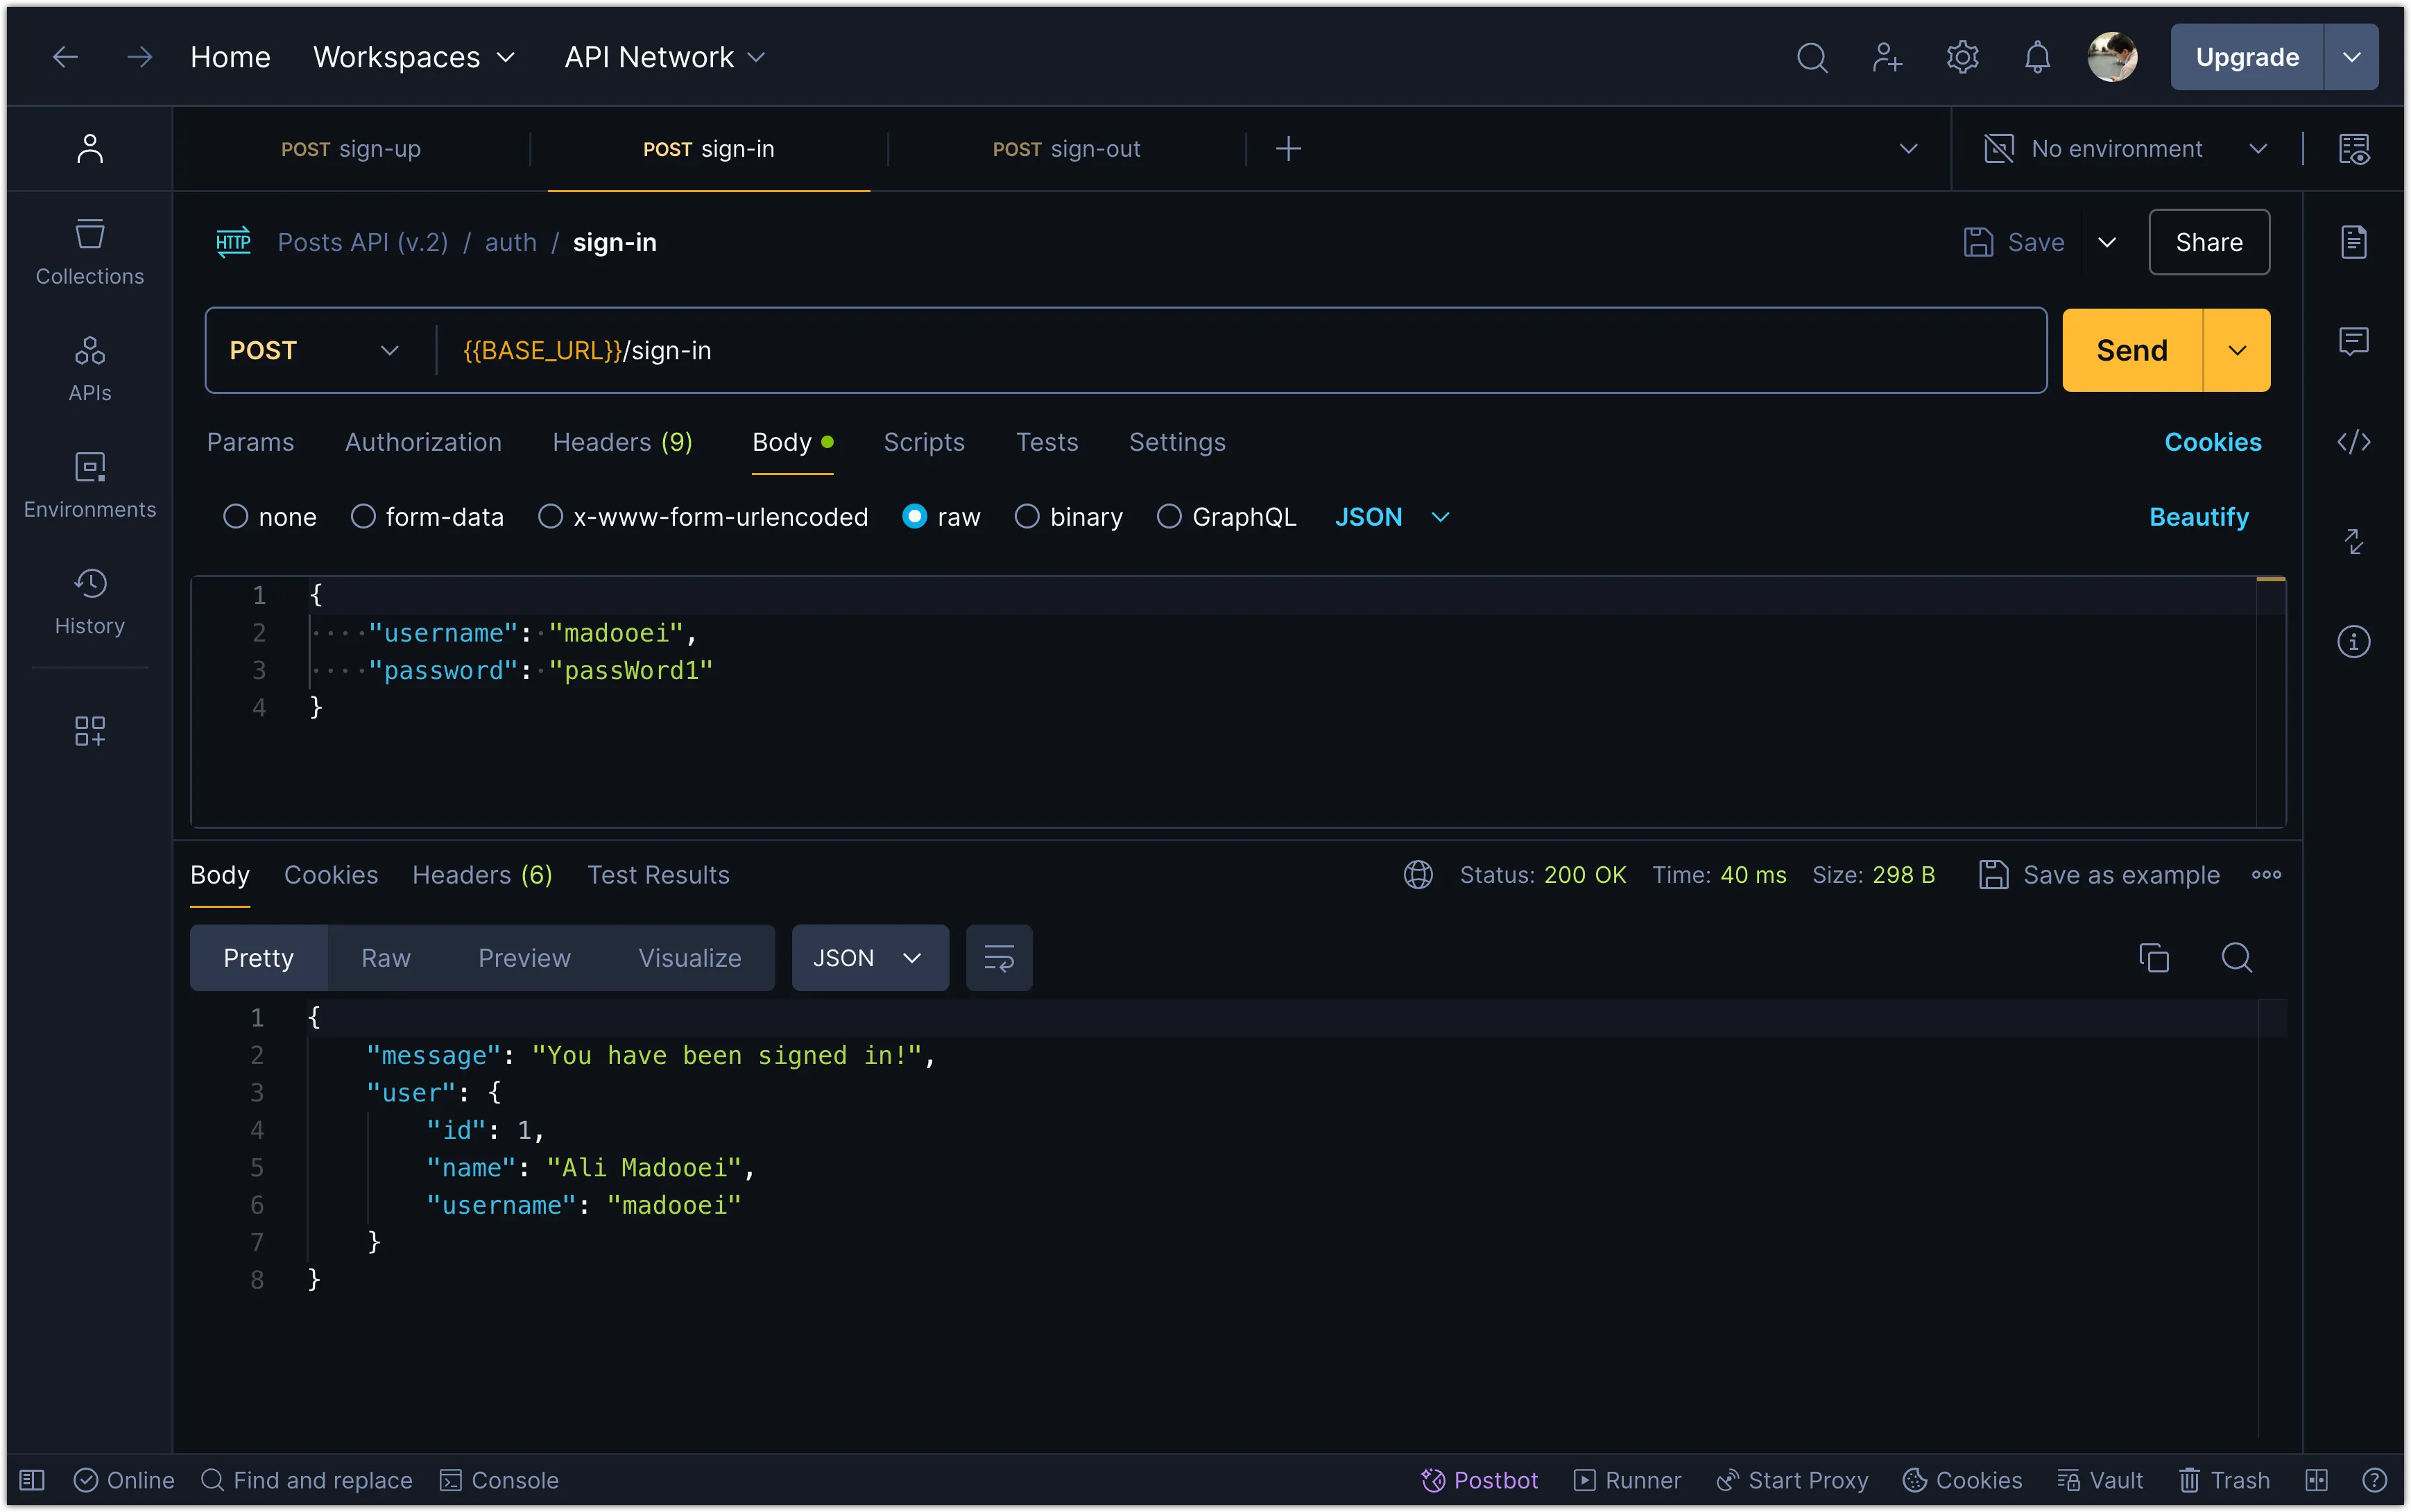
Try signing in with the user you created earlier in Postman.
Also try signing in with an incorrect password to see the error message.
Step 9: Creating User Sessions
In the following steps, you will add the Lucia Auth library to handle user sessions. Lucia Auth provides a simple and secure way to manage user authentication and sessions in your application.
First, install the lucia and @lucia-auth/adapter-drizzle packages:
pnpm add lucia @lucia-auth/adapter-drizzleNext, add the following code to the api/src/db/schema.ts file to create a sessions table:
export const sessions = sqliteTable("sessions", {
id: text("id").notNull().primaryKey(), // must be a string for Lucia Auth
userId: integer("user_id")
.notNull()
.references(() => users.id),
expiresAt: integer("expires_at").notNull(),
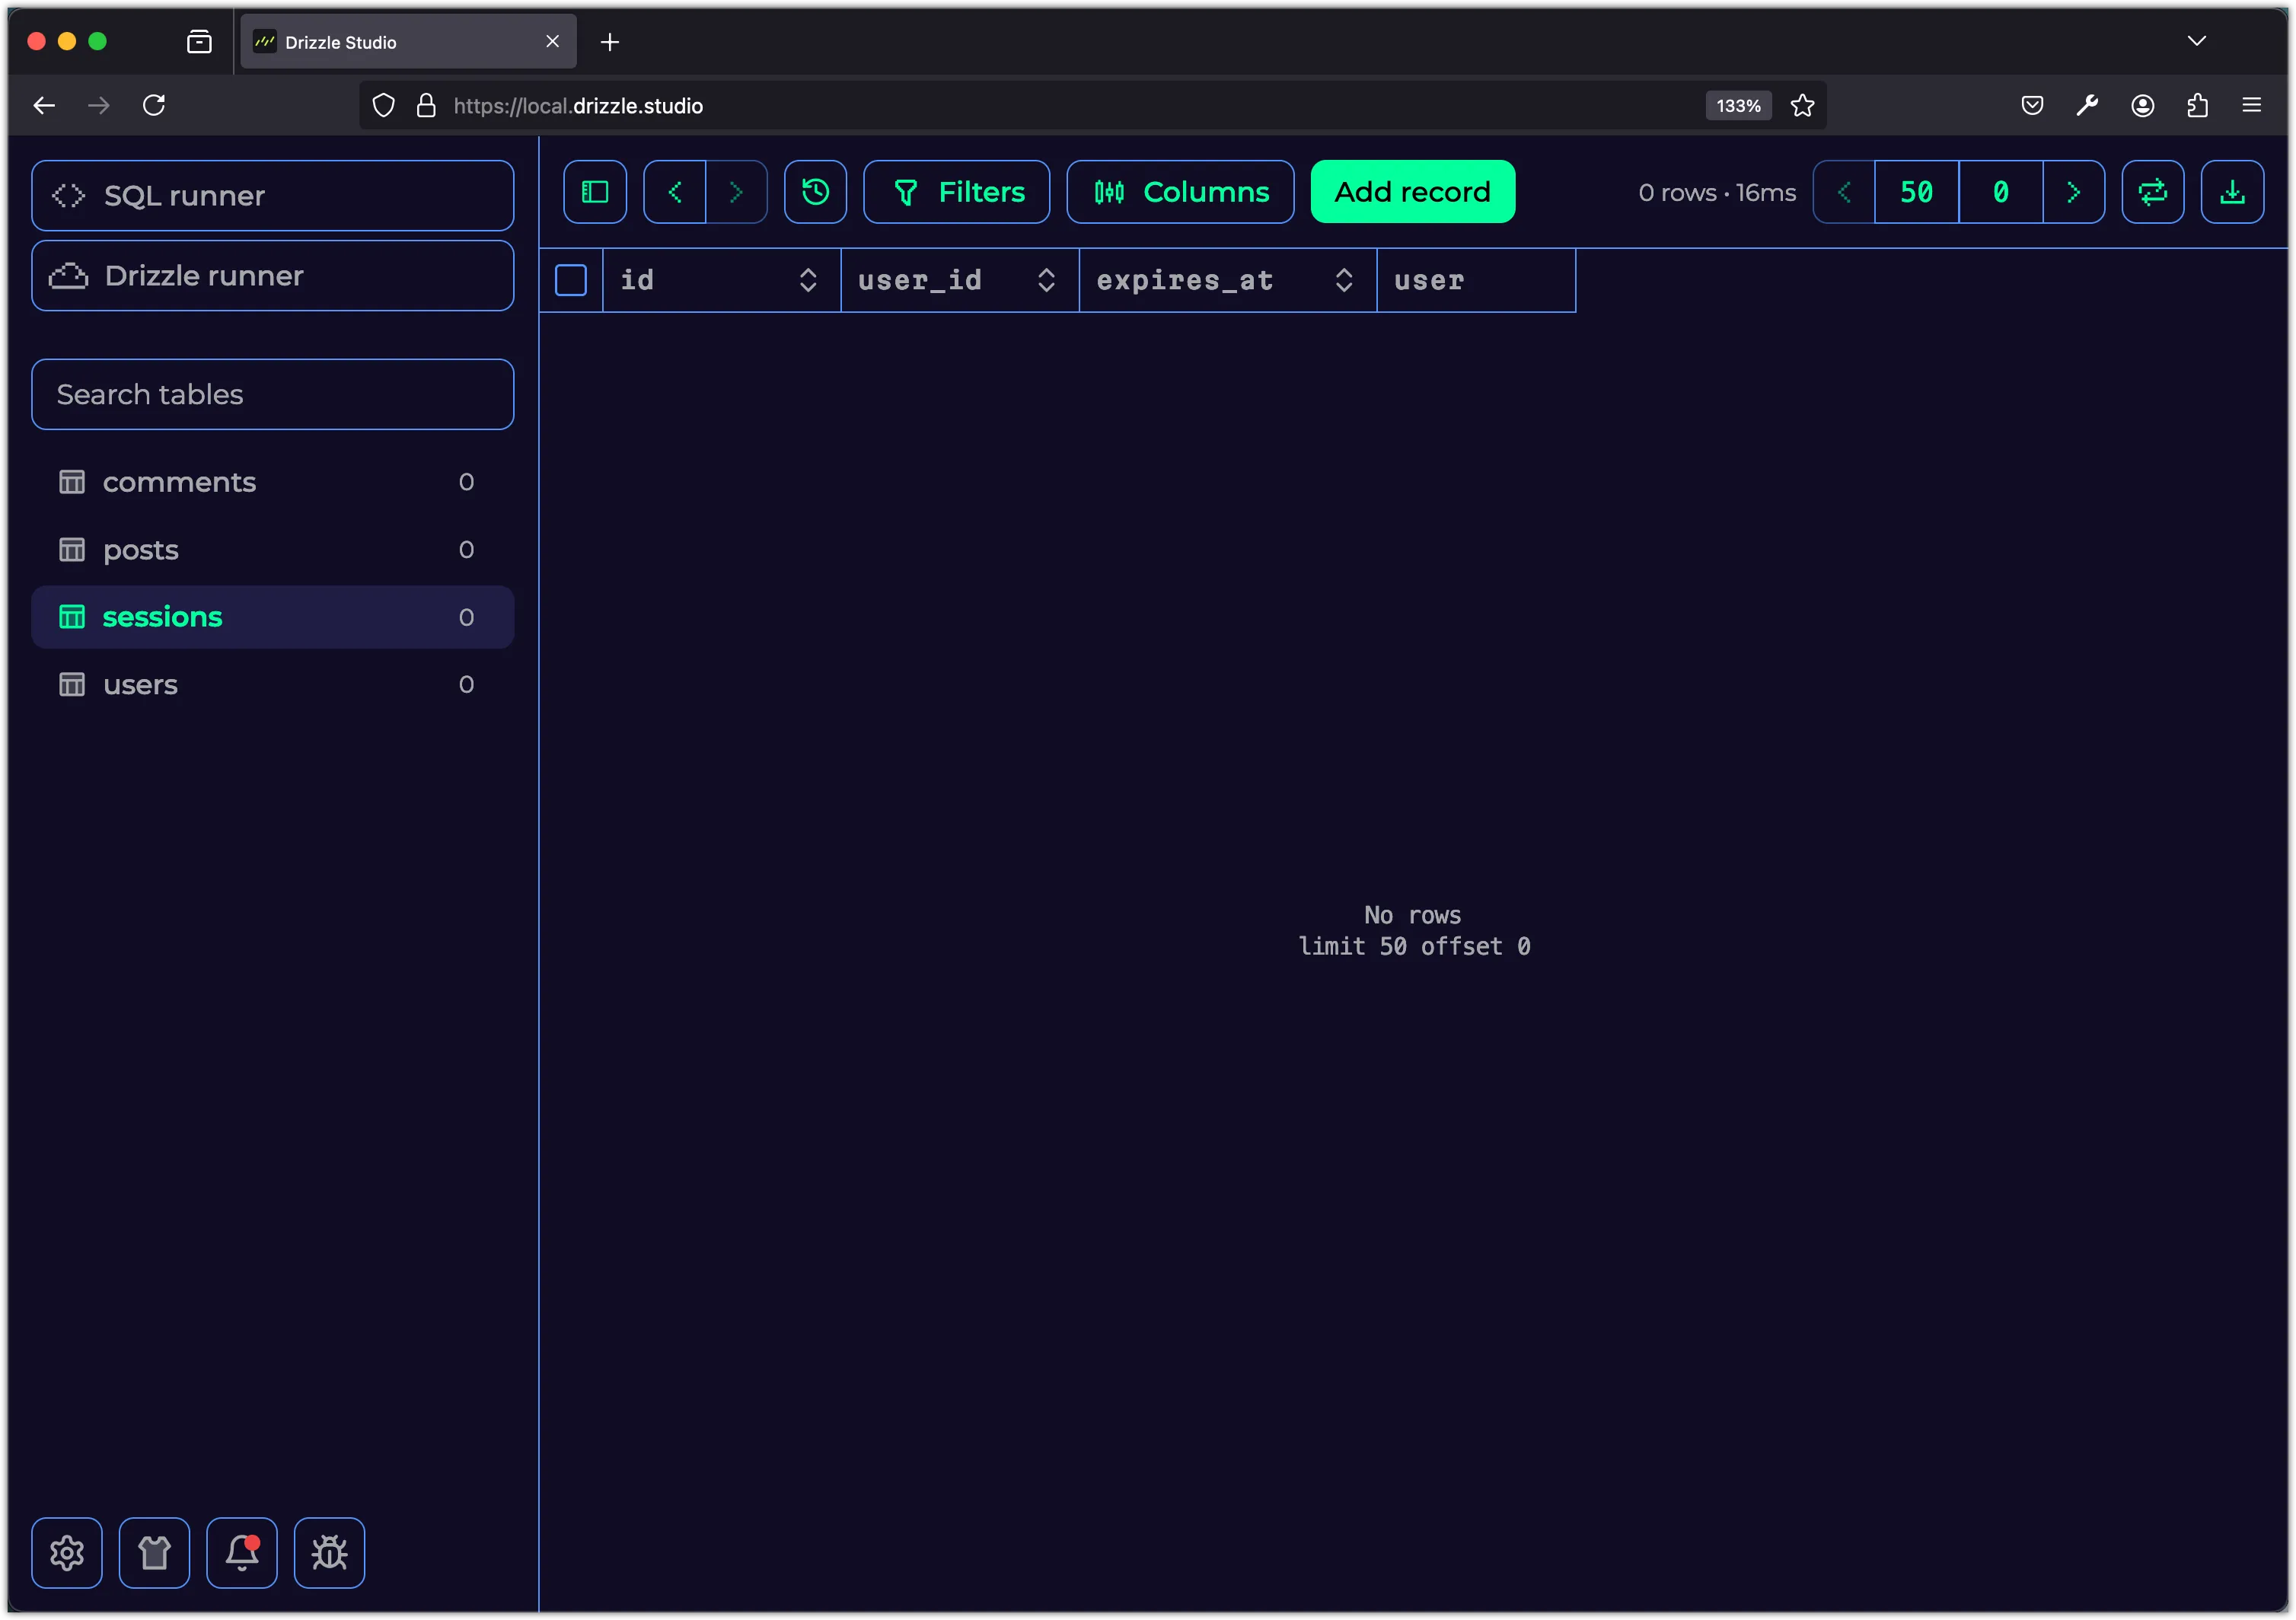
});Notice that the id field is of type text and is the primary key for the sessions table. This is because Lucia Auth requires the session ID to be a string. The sessions table also includes a foreign key userId that references the id field in the users table. This establishes a relationship between the sessions and users tables. The expiresAt field stores the timestamp when the session expires. These fields are essential for managing user sessions and are required by Lucia Auth.
Next, run the following command to update the SQLite database with the new sessions table: (You may need to delete the existing db.sqlite file before running this command)
pnpm db:pushYou should now see the sessions table in the SQLite database.
Step 10: Setting Up the Lucia Auth Adapter
In this step, you will create a new file api/src/db/auth.ts to set up the Lucia Auth adapter:
import { Lucia } from "lucia";
import { DrizzleSQLiteAdapter } from "@lucia-auth/adapter-drizzle";
import { db } from "./index";
import { sessions, users } from "./schema";
const adapter = new DrizzleSQLiteAdapter(db, sessions, users);
export const lucia = new Lucia(adapter, {});
declare module "lucia" {
interface Register {
Lucia: typeof lucia;
UserId: number;
}
}The DrizzleSQLiteAdapter class is used to create an adapter for the Lucia Auth library that interacts with the SQLite database through the Drizzle ORM. The adapter requires the database connection, the sessions table, and the users table as arguments. The lucia instance is created with the adapter and an empty configuration object.
The Register interface is extended to include the Lucia instance and the UserId type. This allows us to use a numeric user ID when interacting with the lucia instance.
The syntax declare module "lucia" {...} is used to extend the lucia module with additional types and properties. In this case, we are adding the Lucia instance and the UserId type to the Register interface.
Step 11: Creating Sessions During Sign-In
In this step, you will update the sign-in route handler to create a session using Lucia Auth. Add the following code to the api/src/routes/auth.ts file:
// Other imports
import { lucia } from "../db/auth"; // 👈 Add this import
authRoutes.post("/sign-in",
zValidator("json", signInSchema),
async (c) => {
// The route handler code
// Create a session (👀 look here)
const session = await lucia.createSession(user.id, {});
return c.json({
message: "You have been signed in!",
session, // 👈 Include the session data in the response
user: {
id: user.id,
name: user.name,
username: user.username,
},
});
}
);
// No changes to the sign-up and sign-out routesTry signing in with a user in Postman to see the session data in the response.
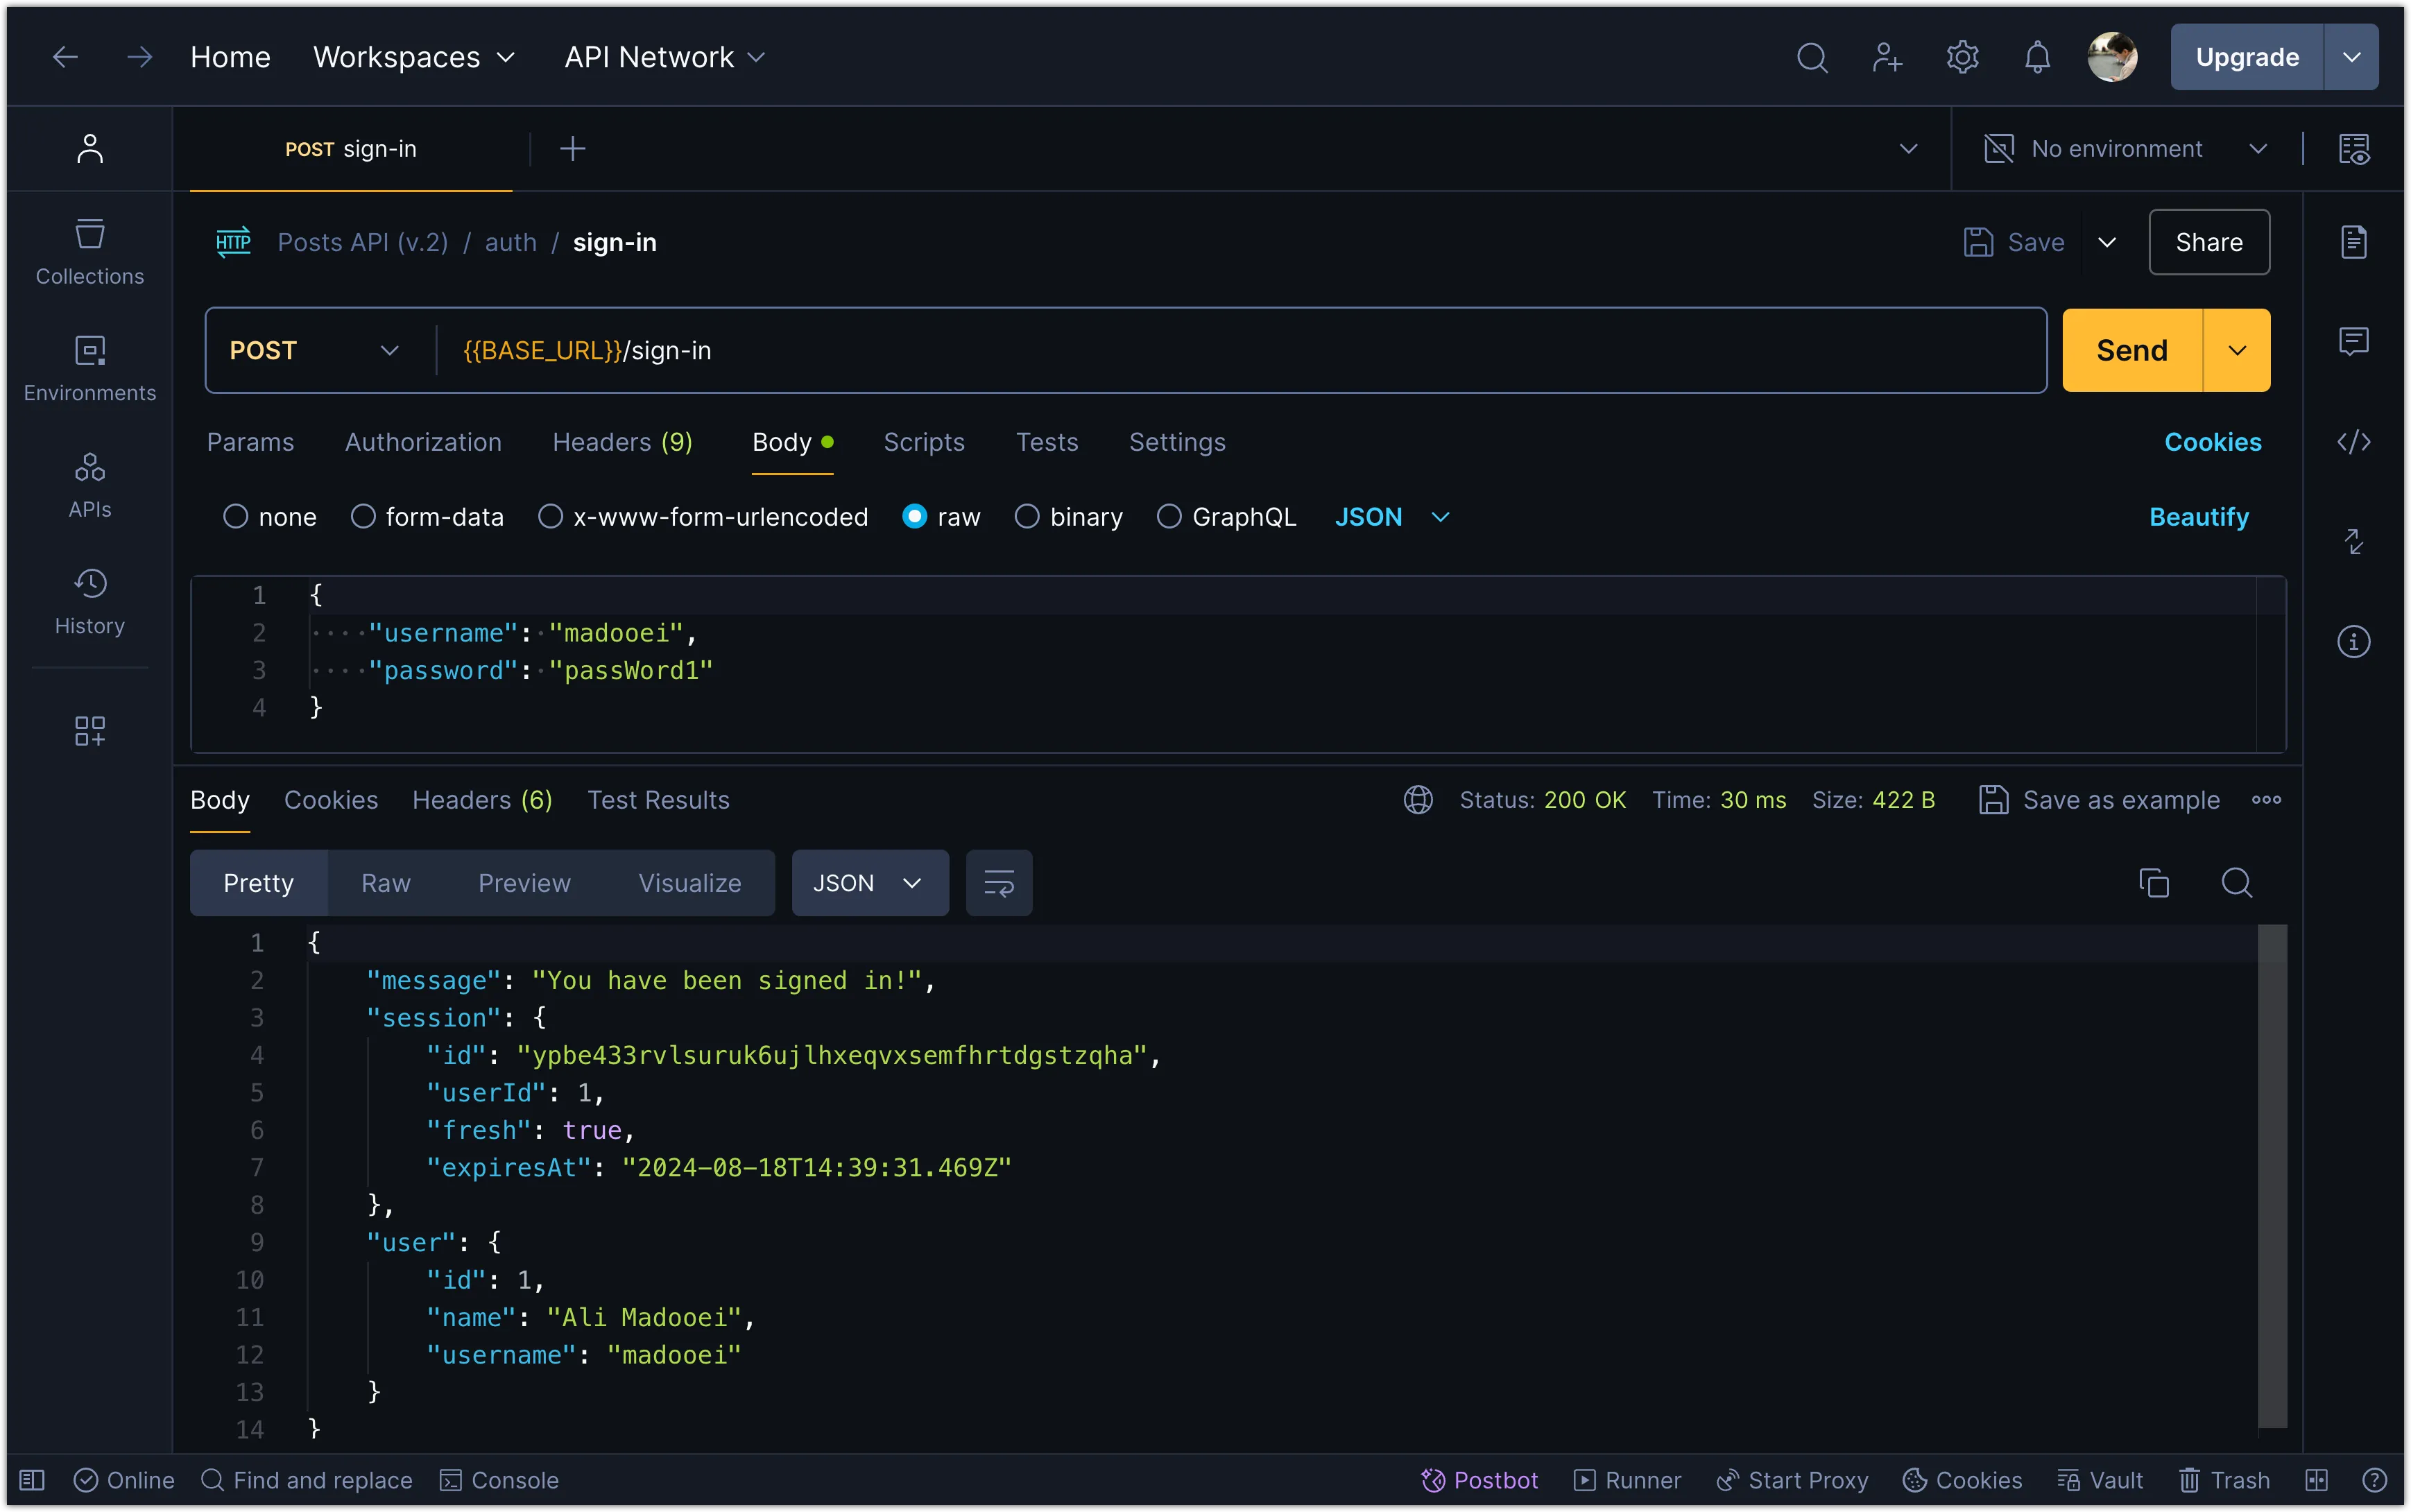
You can also inspect the database in Drizzle Studio to see the session data stored in the sessions table.
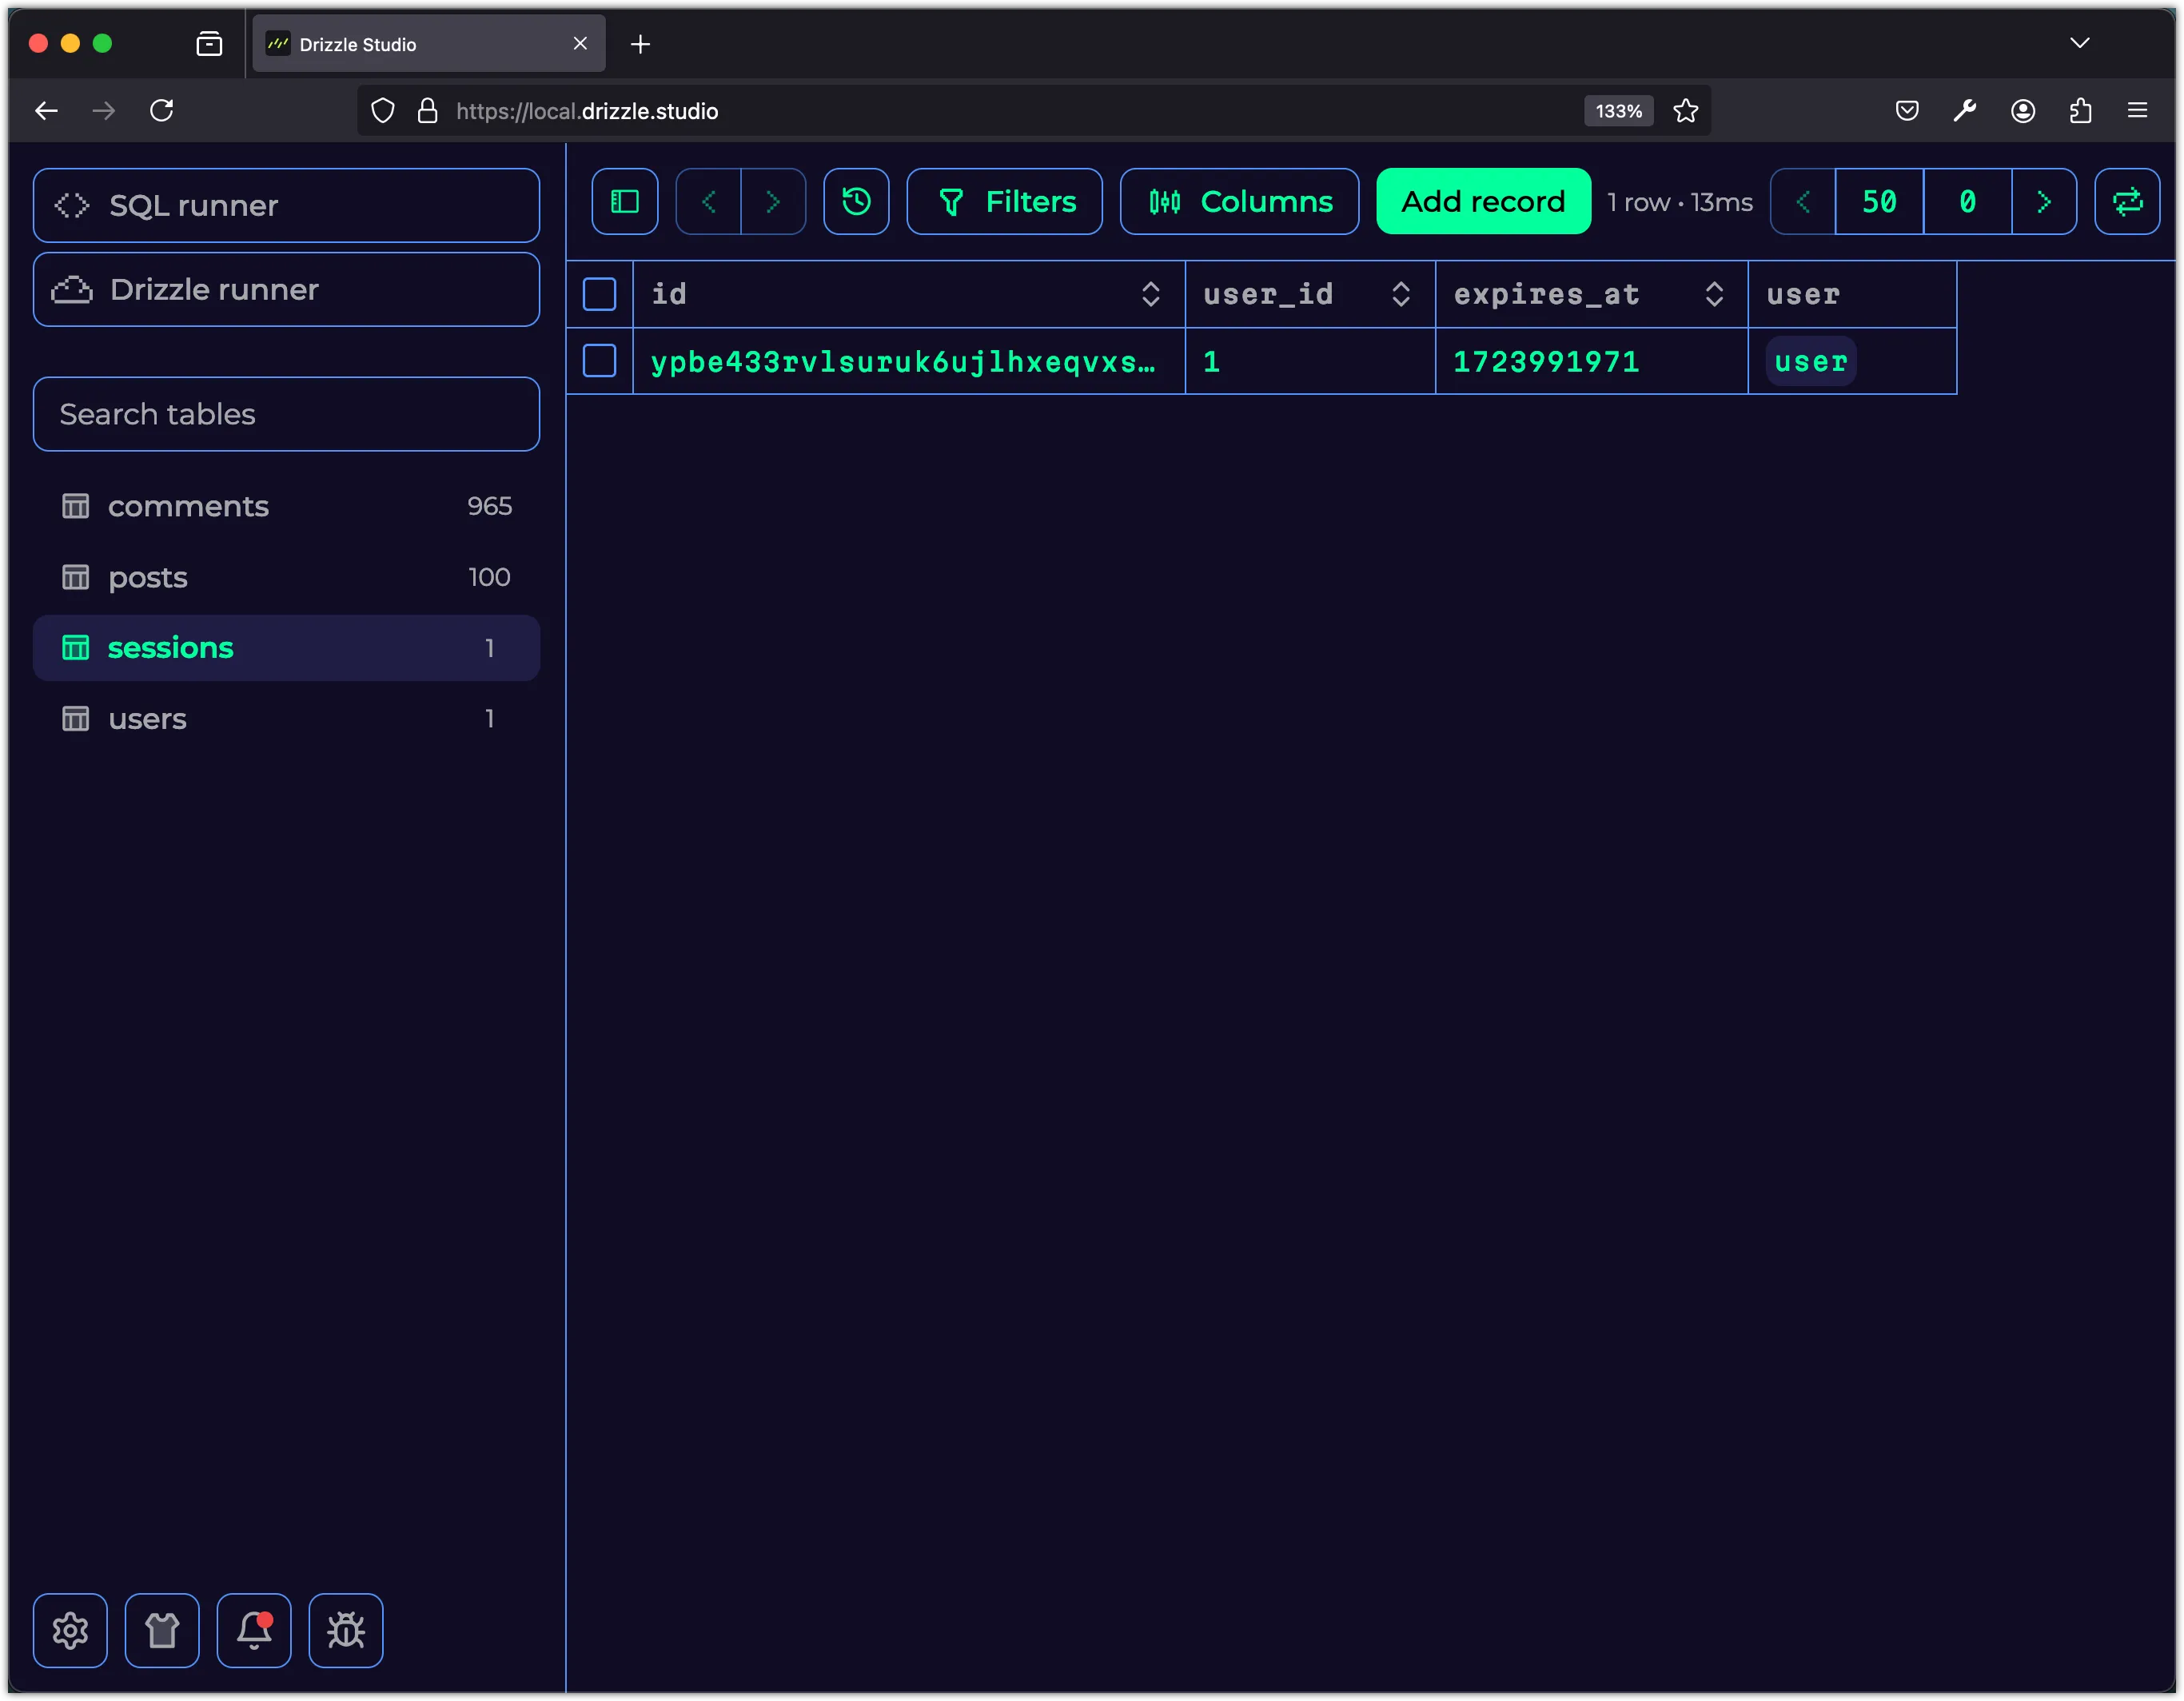
Step 12: Storing Session Data in Cookies
It is a common practice to store session data in cookies to manage user sessions in web applications. In this step, you will update the sign-in routes to set a session cookie in the response headers. Add the following code to the api/src/routes/auth.ts file:
// Other imports
import { lucia } from "../db/auth";
authRoutes.post("/sign-in",
zValidator("json", signInSchema),
async (c) => {
// The route handler code
// Create a session (👀 look here)
const session = await lucia.createSession(user.id, {});
const sessionCookie = lucia.createSessionCookie(session.id);
c.header("Set-Cookie", sessionCookie.serialize(), {
append: true,
});
return c.json({
message: "You have been signed in!",
user: {
id: user.id,
name: user.name,
username: user.username,
},
});
}
);
// No changes to the sign-up and sign-out routesNotice that we are not returning the session data in the response anymore. Instead, we are setting a session cookie in the response headers using the Set-Cookie header. The createSessionCookie method is used to create a session cookie with the session ID. The serialize method is used to serialize the cookie, which is then set in the response headers.
Try signing in with a user in Postman to see the session cookie in the response headers.
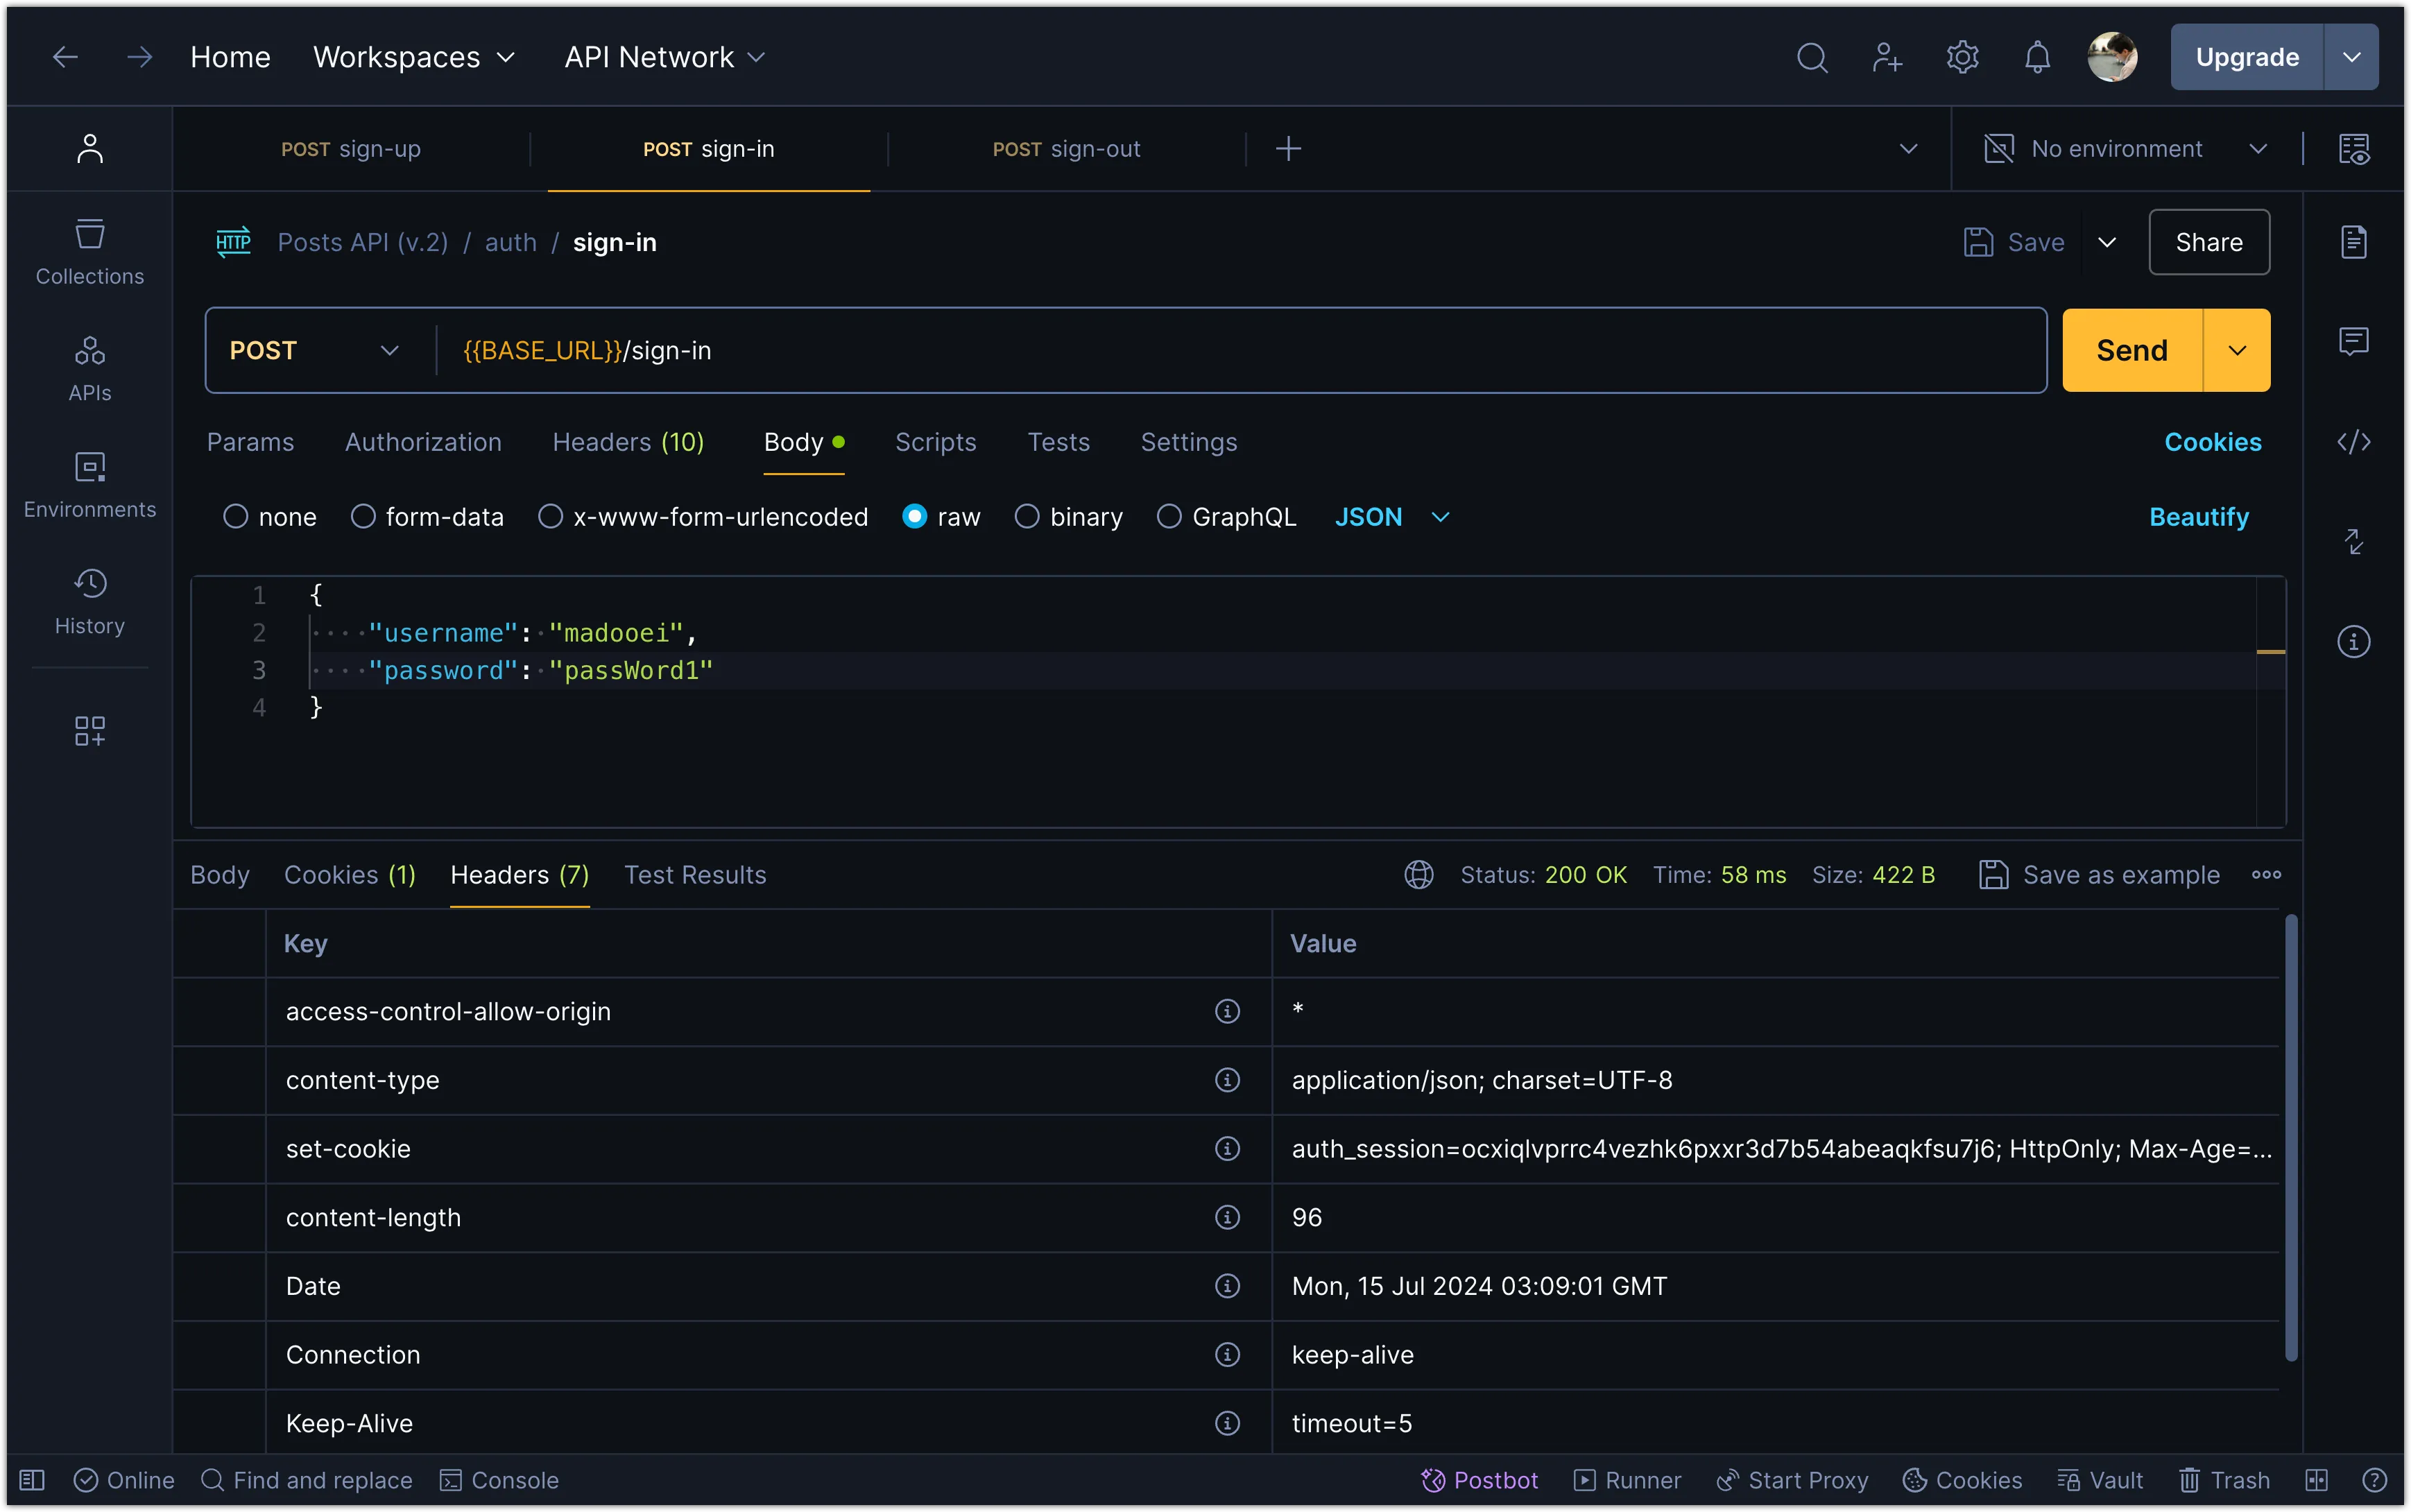
You can also add a console.log statement to see the session cookie in the console. The output should look similar to the following:
Server is running on port 3000
<-- POST /sign-in
Cookie {
name: 'auth_session',
value: 'gpvx4q7dnuv3qpr34wl3v3gtjhjlgq6adkw2r4s6',
attributes: {
httpOnly: true,
secure: true,
sameSite: 'lax',
path: '/',
maxAge: 2592000
}
}
--> POST /sign-in 200 32msStep 13: Create Session Cookies for Sign-Up
It is a common practice to create a session cookie for new users when they sign up. This allows users to be automatically signed in after signing up. In this step, you will update the sign-up route to create a session cookie for new users. Add the following code to the api/src/routes/auth.ts file:
authRoutes.post("/sign-up",
zValidator("json", signUpSchema),
async (c) => {
// The route handler code
// Create a session (👀 look here)
const session = await lucia.createSession(newUser.id, {});
const sessionCookie = lucia.createSessionCookie(session.id);
c.header("Set-Cookie", sessionCookie.serialize(), {
append: true,
});
return c.json(
{
message: "You have been signed up!",
user: {
id: newUser.id,
name: newUser.name,
username: newUser.username,
},
},
201,
);
}
);
// No changes to the sign-out routeNow, when a user signs up or signs in, a session is created, and the session cookie is set in the response headers.
Try signing up with a user in Postman to see the session cookie in the response headers.
Step 14: Signing Out and Clearing the Session Cookie
When a cookie is set in the response headers, the browser automatically includes the cookie in subsequent requests to the same domain. This is how user sessions are maintained across multiple requests. Postman also automatically includes the session cookie in subsequent requests.
To sign out a user, you need to invalidate the session and clear the session cookie.
In this step, you will update the sign-out route to invalidate the session and clear the session cookie. Add the following code to the api/src/routes/auth.ts file:
authRoutes.post("/sign-out", async (c) => {
const cookie = c.req.header("Cookie") ?? "";
const sessionId = lucia.readSessionCookie(cookie);
if (!sessionId) {
throw new HTTPException(401, { message: "No session found" });
}
await lucia.invalidateSession(sessionId);
const sessionCookie = lucia.createBlankSessionCookie();
c.header("Set-Cookie", sessionCookie.serialize()); // Remove the session cookie from the client
return c.json({ message: "You have been signed out!" });
});Let’s break down the changes:
-
The
c.req.header("Cookie")method is used to read the cookie from the request headers. The session ID is extracted from the session cookie using thereadSessionCookiemethod. If no session ID is found, an error is thrown. -
If no session ID is found, an error is thrown.
-
The
invalidateSessionmethod is used to invalidate the session with the given session ID. This is done by removing the session data from thesessionstable. -
The
createBlankSessionCookiemethod is used to create a blank session cookie. This cookie is then set in the response headers to clear the session cookie.
Now, when a user signs out, the session is invalidated, and the session cookie is cleared.
Try signing out in Postman to see the session cookie cleared in the response headers. Note that Postman’s cookie manager enables you to view and edit cookies that are associated with different domains. So when you signed in, the session cookie was stored in Postman’s cookie manager. When you send any subsequent requests, Postman automatically includes the session cookie in the request headers.
Conclusion
In this task, you added authentication to the Posts app using the Lucia Auth library. You implemented user sign-up, sign-in, and sign-out functionality. You also learned about password hashing, input validation, and session management. In the next task, we will update the Posts app UI to allow users to sign up, sign in, and sign out.